Acoustic Panels for Home Theater: Types, Placement, and DIY Options
Most home theaters sound worse than they should. The room itself is the problem: parallel walls bounce sound back and forth, hard surfaces reflect audio from every direction, and flutter echo turns dialogue into a muddy wash. A well-chosen set of acoustic panels eliminates those problems without requiring a construction permit or a contractor.
This guide covers the panel types that actually work, what NRC ratings mean in practice, where to put panels so they do the most good, and how to build effective panels yourself for a fraction of commercial prices.
Understanding NRC Ratings Before You Buy
NRC stands for Noise Reduction Coefficient. It measures how much sound a material absorbs on a scale from 0 to 1.0, where 0 reflects everything and 1.0 absorbs everything. A panel with an NRC of 0.85 absorbs 85% of the sound that hits it.
The rating matters, but it tells only part of the story. NRC is averaged across frequencies (typically 250Hz, 500Hz, 1kHz, and 2kHz), so a panel can have a strong NRC number and still perform poorly at the bass frequencies where most home theater problems live. When comparing products, look for the full absorption coefficient data across the frequency range, not just the single NRC number on the label.
Panels with NRC ratings of 0.80 or above are appropriate for serious acoustic treatment. Anything below 0.65 is decorative at best.
The Three Main Panel Types: What They Are and What They Do
Fiberglass Panels (OC 703 and OC 705)
Owens Corning 703 and 705 are the standard materials for professional acoustic panels. Both are rigid fiberglass board products. The 703 is slightly less dense; the 705 is denser and performs marginally better at lower frequencies within the mid-range.
At 2 inches thick, fiberglass panels absorb frequencies from roughly 500Hz and up, which covers sibilance, upper midrange clarity, and most of the reflection problems that blur dialogue. At 4 inches, absorption extends down into the lower midrange, around 250Hz. This is meaningful for home theater because many male voices and instrument fundamentals live in this range.
OC 703 is the more widely available product and the default choice for DIY panels. It cuts cleanly with a bread knife, frames easily, and delivers NRC ratings above 0.95 when tested. The trade-off is that raw fiberglass irritates skin and requires care during handling.
Mineral Wool Panels (Rockwool Safe’n’Sound)
Rockwool Safe’n’Sound is the other commonly recommended DIY material. Originally designed for interior wall soundproofing, it works well for absorption panels because of its density and fiber orientation. It is slightly less irritating to handle than fiberglass, which makes the building process more comfortable.
Safe’n’Sound performs similarly to OC 703 in the critical mid and upper frequency ranges. Its NRC is typically in the 0.90-0.95 range depending on thickness. The main limitation is that it is sold in batts sized for stud bays, which means trimming to custom sizes. It is also widely available at home improvement stores without special ordering.
For a home theater where the builder wants fewer precautions during construction, Rockwool Safe’n’Sound is a reasonable alternative to fiberglass.
Acoustic Foam: The Least Effective Option
Acoustic foam (the kind sold in wedge or pyramid tiles) is ubiquitous in photos of home recording studios and home theaters, but it consistently underperforms compared to rigid fiberglass or mineral wool products of equivalent thickness.
The core problem is density. Foam is too light to absorb much below about 1kHz, which means it mostly handles high-frequency reflections (the “air” and “brightness” of sound) while leaving the problematic mid-range largely untreated. It is also fragile, prone to crumbling over time, and often a fire hazard in untreated versions.
Foam tiles are not worthless. They can reduce some flutter echo in practice spaces. But for a home theater where dialogue clarity and bass management are the goal, foam should not be the primary treatment material. Covering every wall with 1-inch foam tiles will make a room sound dead at high frequencies while leaving the core problems intact. This is one of the most common acoustic treatment mistakes.
Thickness and What It Actually Controls
Absorption panel effectiveness at low frequencies depends almost entirely on thickness. This is not a marketing claim; it follows directly from physics. Sound waves at bass frequencies are physically large. A 60Hz wave is about 18 feet long. A 2-inch panel cannot meaningfully interact with it.
The practical breakdown for home theaters:
2-inch panels absorb well from 500Hz and up. They handle most reflection problems that affect dialogue intelligibility and stereo imaging. A 2-inch panel from OC 703 is the workhorse of acoustic treatment.
4-inch panels extend absorption down to around 250Hz, picking up lower midrange where many instruments and voices fundamental frequencies live. For a room that sounds thick or congested in dialogue, 4-inch panels at primary reflection points make a more noticeable difference than 2-inch.
6-inch panels and dedicated bass traps address bass frequency problems, roughly 20Hz to 125Hz. True bass control requires either thick broadband absorbers (at least 6 inches of dense material) or purpose-built bass traps designed to sit in room corners where low-frequency energy concentrates. A room with noticeable bass buildup or a strong low-frequency room mode (the “boom” on certain notes) requires corner trapping, not more mid-range panels.
Bass traps deserve their own category. They typically consist of thick fiberglass or rigid mineral wool built into corner-filling triangular frames. They are larger, heavier, and more expensive than standard panels, but they address the acoustic problems that panels alone cannot fix.
Commercial Panels: The Established Brands
Several manufacturers produce ready-to-hang acoustic panels appropriate for home theaters. Quality varies, but the following have established track records:
GIK Acoustics is widely regarded as the price-to-performance leader in the enthusiast market. They manufacture panels using OC 703 and similar materials, offer a variety of sizes and depths, and produce real absorption coefficient data for their products. Their Monster Bass Traps and 242 panels are popular starting points for home theater rooms.
Acoustimac offers a similar product range with strong user reviews and consistent NRC data. They manufacture panels in a wide range of fabric colors, which is relevant for rooms where aesthetics matter.
ATS Acoustics produces panels and bass traps with published testing data. Their panels are available in custom sizes, which is useful when standard dimensions do not fit the room.
Primacoustic targets both professional recording and home audio markets. Their Broadway series panels are well-built and widely distributed through music equipment retailers. Pricing is higher than the other options, which reflects the brand’s position in professional markets rather than meaningfully superior performance.
Commercial panels typically run $80 to $200 per unit depending on size, thickness, and brand. A properly treated 12-by-15-foot home theater room requires 8 to 12 panels for first reflection coverage, putting the commercial route at $640 to $2,400 before any bass trapping.
DIY Panels: How to Build Them for $30-50 Each
Building acoustic panels with OC 703 and standard lumber is not technically demanding. The result is acoustically equivalent to commercial panels at roughly one-third the cost.
Materials for one 24x48-inch panel:
- One sheet of OC 703, 2-inch, 24x48 inches (cut from a 48x96 sheet)
- Two 8-foot 2x4 studs ripped to 1.5x1.5 inches, or 1x4 lumber
- Wood screws
- Corner brackets
- Fabric (guilford of maine FR701 is the standard acoustic-transparent choice, or any tightly woven fabric that allows airflow through it)
- Staple gun
Basic process: Build a rectangular frame from the lumber sized to match the fiberglass dimensions. Set the fiberglass into the frame. Wrap fabric over the face and staple it to the back of the frame. Add hanging hardware.
The critical variable is the fabric. It must be acoustically transparent, meaning air (and sound) can pass through it without significant resistance. Hold the fabric up to your mouth and try to blow through it. If air moves freely, the fabric will not impede sound absorption. Dense upholstery fabric fails this test and will reduce panel effectiveness. Muslin, guilford of maine FR701, and similar open-weave fabrics work correctly.
Total material cost runs $30 to $50 per panel at current lumber and material prices, depending on fabric choice. For 10 panels, that is $300 to $500 versus $800 to $2,000 for equivalent commercial panels.
For homeowners who want better visual integration, fabric can be custom printed with images, patterns, or artwork while maintaining acoustic transparency. Several printing services offer this specifically for acoustic panel covers.
Placement: Where Panels Do Their Work
Acoustic panels are most effective at first reflection points. These are the surfaces where sound from the speakers reaches the listening position after a single bounce, rather than traveling directly. First reflections arrive a few milliseconds after the direct sound and blur the audio image.
The primary first reflection points in a standard rectangular home theater room are:
Side walls: The reflection points are on the left and right walls at a position roughly midway between the speakers and the listening position. This is where side-wall panels have the most impact on stereo imaging and dialogue clarity.
Ceiling: Sound bounces off the ceiling between the screen and the listening position. A ceiling panel or cloud (a panel suspended horizontally above the seating area) at this point significantly improves clarity.
Rear wall: Rear-wall treatment prevents sound from bouncing back toward the screen and causing comb filtering. In a dedicated theater room with surround speakers, the rear wall typically receives panels between the surround speaker positions.
Finding the Exact Reflection Point with the Mirror Trick
The mirror trick is the reliable method for locating first reflection points on side walls. Sit in the main listening position. Have a second person slide a mirror along the side wall. The reflection point is wherever you can see a speaker in the mirror. Place a panel centered on that spot.
This works because light and sound follow the same reflection angle law. The visual reflection shows you exactly where sound is bouncing.
For ceiling reflections, the same principle applies: use the mirror on the ceiling to find where you can see the front speakers from the listening position.
How Many Panels a Room Actually Needs
A typical 12x15-foot dedicated home theater room with hard walls, a hard floor, and no upholstered seating typically requires 8 to 12 panels to achieve reasonable acoustic treatment. This is not a precise prescription; room proportions, ceiling height, and existing soft furnishings all shift the number.
The starting point most acousticians recommend is treating the four primary first reflection points (left wall, right wall, ceiling between speakers and seats, and rear wall), then evaluating whether additional treatment is needed. This typically means 4 to 6 panels in the first pass.
Rooms with carpeted floors, upholstered seating, and fabric window coverings already have some natural absorption. These rooms need less panel treatment than bare rooms. The goal is not a specific panel count; it is a room that has even decay across the frequency range without excessive reverb or dead spots.
One reliable warning sign of insufficient treatment: turning up the volume makes the room sound louder but not clearer. This indicates reflection buildup. Adequate panel coverage should let you raise the volume and hear increased clarity alongside the increased level.
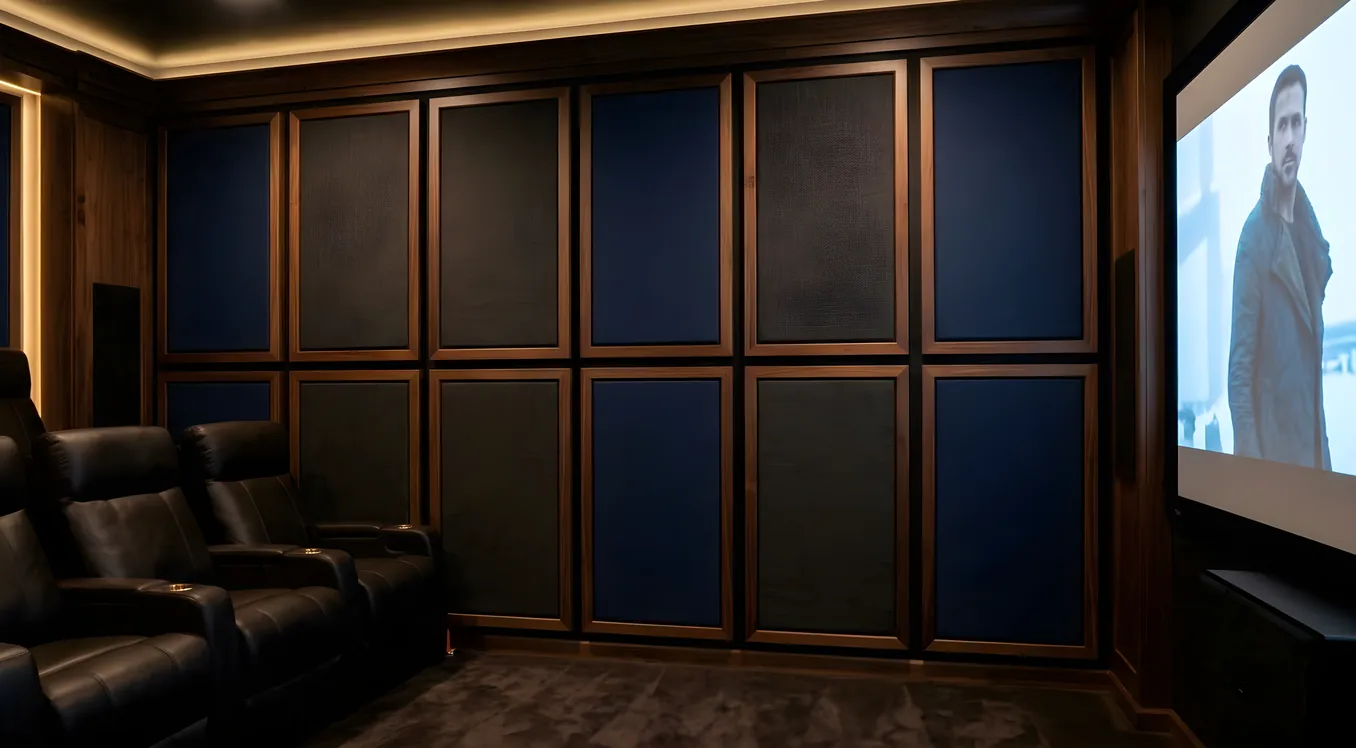
Aesthetic Integration: Panels That Look Intentional
A common objection to acoustic treatment is that panels look utilitarian. This is partly a sourcing problem. Panels in dark gray utility fabric on bare wood frames look like recording studio gear. Panels in coordinating fabric colors with finished frames look like wall art.
Fabric is the primary design variable. Panels can be covered in nearly any acoustic-transparent fabric, including printed designs, solid colors matched to the room palette, or even custom artwork. The frame can be stained or painted to match trim.
Several fabricators offer panels with decorative perimeter frames. GIK Acoustics, Acoustimac, and others offer custom fabric options and frame colors. DIY builders have the same flexibility at lower cost.
Panels can also be shaped. Rectangular panels are most common, but the acoustic performance is largely frame-geometry-independent. Arched or irregular shapes are possible for rooms where rectangular geometry conflicts with the design.
For rooms where panels cannot be openly visible (living rooms serving double duty as theaters, for example), thick upholstered wall hangings, floor-to-ceiling curtains on the rear wall, and overstuffed seating provide partial absorption. These solutions do not match dedicated panels in performance, but they are meaningfully better than untreated hard surfaces.
What Not to Do
A few approaches cause persistent problems in home theater acoustic treatment:
Covering every surface creates a room that sounds acoustically dead. Over-damped rooms feel unnatural and tiring to listen in. Acoustic treatment is about balance, not maximum absorption. Leave some reflective surfaces and plan for diffusion on the rear wall if the room is fully dedicated. The guide to diffusion versus absorption covers this balance in detail.
Relying entirely on acoustic foam tiles leaves bass frequency problems unaddressed. See the foam section above. Foam is not a complete treatment strategy for a home theater.
Egg carton foam performs at essentially zero effectiveness for home theater acoustics. It has a negligible effect on sound because of its very low mass and the frequency range of its minimal absorption. This myth persists because egg cartons look vaguely like acoustic foam. They are not equivalent.
Skipping bass treatment when the room has audible bass problems. Adding more mid-range panels to a room with bass buildup does not fix the bass. Corner trapping is required.
For the full picture of how acoustic treatment fits into room design, the guide to home theater acoustics fundamentals covers room modes, the reflection-absorption-diffusion balance, and treatment sequence.
Getting the Room Right
Acoustic panels are not a finishing touch. In a dedicated home theater, they are part of the room’s audio system. A $3,000 speaker package in an untreated room will sound worse than a $1,200 package in a properly treated room.
The straightforward path for most rooms: start with six to eight panels covering the primary first reflection points on both side walls, the ceiling, and the rear wall. Use 2-inch OC 703 or Rockwool Safe’n’Sound, either commercial panels or DIY builds. Evaluate the room with familiar content. Add bass trapping in corners if low frequencies are audible problems. Adjust the quantity and placement from there.
How the panels look on the wall is a real design concern worth taking seriously. The approach to integrating acoustic treatment with room aesthetics is covered in detail in the guide to home theater room aesthetics.
The tools exist to build a room that sounds as good as it looks. The physics are not complicated, and the materials are available at home improvement stores.