Home Theater Acoustics: Why the Room Matters More Than the Speakers
You can spend $10,000 on speakers and still get mediocre sound. The reason is almost always the room. Home theater acoustics are the single largest variable in any audio system, yet they get a fraction of the attention that equipment does. This guide covers the physics of sound in enclosed spaces, the specific problems that affect home theaters, and how to address them in order of impact.
How Sound Behaves in an Enclosed Space
When a speaker produces sound, you’re hearing two things at once: the direct signal traveling straight from the driver to your ears, and every reflected copy of that signal bouncing off walls, ceilings, and floors before it arrives. In an open field, you’d only hear the direct signal. In a room, the ratio of direct to reflected sound shifts dramatically depending on your distance from the speaker and how reflective the surfaces are.
Sound reflection follows the same angle-of-incidence rule as light: the angle at which it hits a surface equals the angle at which it leaves. This is predictable and, importantly, treatable.
Absorption converts sound energy into heat as waves pass through porous material. Thick, soft materials absorb low frequencies; thinner materials handle the high end. Diffusion scatters reflections in multiple directions rather than absorbing them, which breaks up specular reflections without deadening the room entirely. Diffraction happens when sound bends around objects or through openings. Refraction occurs when sound changes speed moving through air at different temperatures, though this rarely matters indoors.
Room Modes: The Bass Problem Nobody Talks About
Room modes are the most damaging acoustic phenomenon in a home theater, and they’re caused by the room’s own dimensions. When a sound wave bounces between two parallel surfaces, it reinforces itself at specific frequencies related to the distance between those surfaces. These resonant frequencies are called standing waves.
There are three types. Axial modes involve just one pair of parallel surfaces: floor/ceiling, left/right walls, or front/back walls. They’re the strongest and most audible. Tangential modes involve two pairs of surfaces and carry roughly half the energy of axial modes. Oblique modes bounce off all six surfaces simultaneously and are the weakest of the three.
The fundamental axial mode frequency for any dimension is calculated by dividing 565 by the distance in feet (or 172 by the distance in meters). So a room that’s 14 feet long resonates at roughly 40 Hz. That frequency and its harmonics at 80 Hz, 120 Hz, and beyond will all be affected. At certain listening positions, these modes create bass peaks that make some notes sound boomy and exaggerated. At other positions, they create nulls where bass nearly disappears. You can walk around a room during playback and hear the bass volume change dramatically depending on where you stand.
Room mode calculators (available free online) will show you every axial, tangential, and oblique mode for your room dimensions. Enter your length, width, and height to see where the trouble frequencies are stacked.
RT60: The Measure of a Room’s Decay
RT60 is the time it takes for a sound to decay by 60 dB after the source stops. A large cathedral might have an RT60 of 6 seconds or more. A living room might measure 0.4 to 0.6 seconds. For home theater specifically, the target range is 0.3 to 0.5 seconds, with some preference for the lower end.
A room with too-long RT60 blurs transients, muddies dialogue, and makes multi-channel spatial effects harder to perceive clearly. Excessive decay smears the attack of percussion, softens bass definition, and generally makes everything sound like it’s happening in a bathroom. A room with too-short RT60 sounds artificially dead and fatiguing to listen to over a two-hour film.
RT60 is measured by making an impulse (a starter pistol, a balloon pop, or a test signal) and capturing the decay with a measurement microphone. Free tools like REW (Room EQ Wizard) will calculate RT60 from the recording. The measurement should be taken at the primary listening position and preferably at multiple positions.
Getting to 0.3 to 0.5 seconds requires acoustic treatment. The proportional amount of treatment depends on the room’s current state, its volume, and the materials already present: carpet, upholstered furniture, and heavy curtains all contribute meaningful absorption.
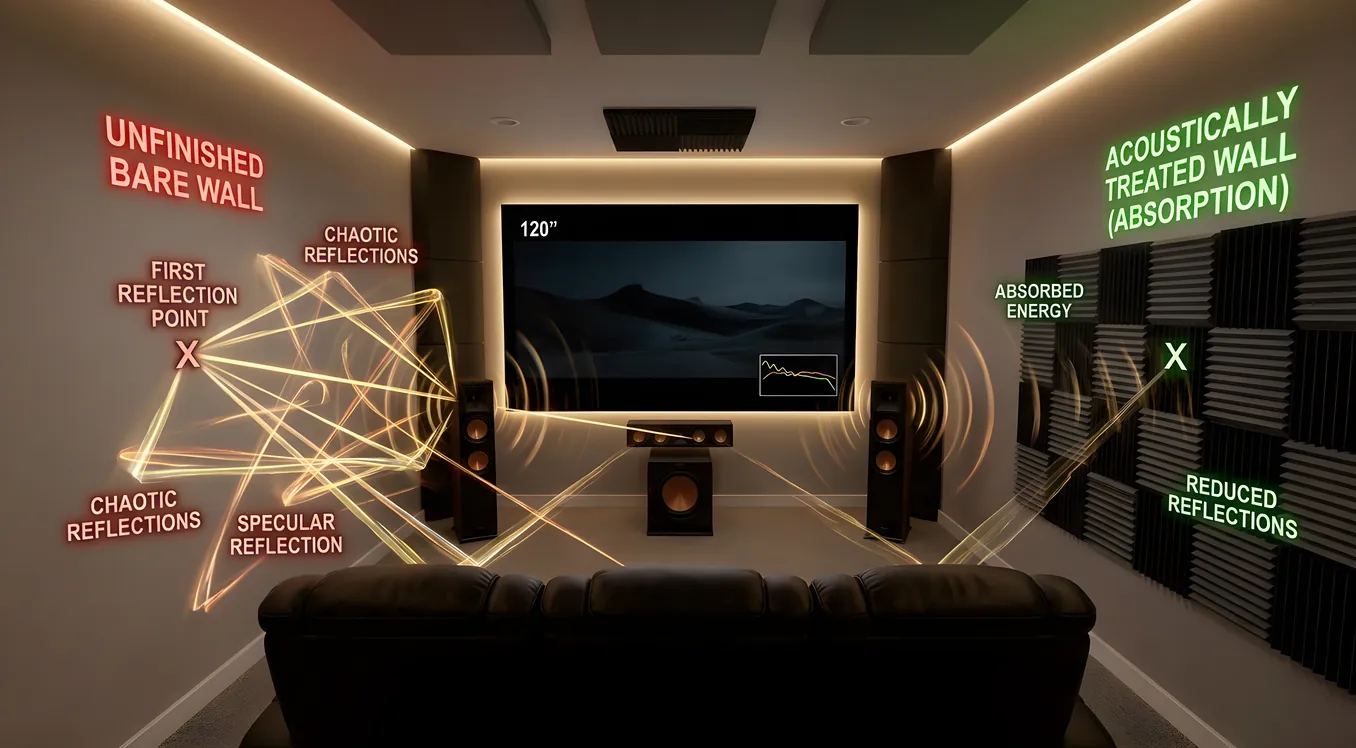
Finding First Reflection Points
The mirror trick is a reliable low-tech method for finding first reflection points. Sit in your primary listening position, have someone hold a mirror flat against the side wall, and slide it forward and back while you watch from the seat. When you can see a speaker in the mirror, that’s where the first reflection off that wall will land. Mark it. Repeat on the other side wall, the ceiling, and the front wall.
First reflections arrive at your ears a few milliseconds after the direct signal, at roughly the same level. This timing creates comb filtering, which causes peaks and dips at mathematically predictable intervals across the frequency range. The subjective result is a colored, diffuse image with poor spatial specificity. Treating first reflection points with acoustic panels reduces comb filtering and tightens the stereo image noticeably, often more than an equipment upgrade would.
Flutter Echo Between Parallel Walls
Flutter echo is a high-frequency ringing that happens when sound bounces rapidly back and forth between two hard, parallel surfaces. Clap sharply in an untreated room with concrete or drywall walls and listen: the sound will decay with a metallic, birdlike chirp rather than a clean fade. That’s flutter echo.
It’s most audible in the midrange and high frequencies and makes voices sound strange, as if there’s a subtle reverb effect applied to speech. Flutter echo requires either absorption on one or both parallel surfaces or an asymmetric room layout that breaks up the parallel geometry.
Standing Waves and Bass Peaks/Nulls
Standing waves are the physical consequence of room modes. At the resonant frequency, the sound wave and its reflection align constructively or destructively depending on position. At a peak node, bass energy adds together and sounds louder than it should. At a null, the energies cancel and bass effectively disappears.
A standard listening room might have a bass null so severe at certain frequencies that the effect is several octaves worth of usable bass response. This is why a subwoofer that sounds excellent in one position sounds anemic six feet away. Bass traps address standing waves by absorbing the low-frequency energy before it can build up into problematic peaks and nulls. See the dedicated bass traps guide for sizing and placement specifics.
Room mode problems cannot be fixed with equalization alone. EQ can reduce peaks, but it cannot fill in nulls because there’s no energy there to equalize. Treating the room removes energy from the peaks, which reduces the severity of both, but physical treatment and careful speaker/listener positioning are the primary tools.
Acoustic Treatment vs. Soundproofing
These two concepts address completely different problems, and conflating them is one of the most common mistakes in home theater planning.
Acoustic treatment is about what happens to sound inside the room. Its goal is to manage reflections, absorption, and decay time so the room sounds accurate and controlled. Treatment panels, bass traps, and diffusers are acoustic treatment products.
Soundproofing is about preventing sound from traveling between rooms. It’s a construction problem, not an acoustics problem. Soundproofing requires mass (heavy materials like concrete or multiple layers of drywall with damping compound), decoupling (isolating the walls and floor from the structure to break vibration paths), and sealing every air gap. Hanging fabric panels on a wall does nothing meaningful for soundproofing. Building a room within a room, or using resilient channel and mass-loaded vinyl, addresses it properly.
The overlap is minimal. You can have a highly treated room that still bleeds sound to adjacent spaces. You can have a well-soundproofed room that sounds terrible inside because it’s reverberant and untreated. Most home theater projects need both, addressed separately. The soundproofing guide covers construction methods in detail.
Treatment Priorities in Order of Impact
Not all acoustic work delivers equal results. Here’s the sequence that produces the most audible improvement per dollar spent.
First reflections come first. Side wall, ceiling, and sometimes front wall treatment directly addresses comb filtering at the listening position. The perceptual improvement in stereo imaging and dialogue clarity is immediate. This is where the mirror trick points you.
Rear wall treatment comes second. In a multichannel setup, the rear channels and the back wall interact significantly. A combination of absorption and diffusion at the rear wall prevents the back wall from collapsing the surround soundstage.
Bass traps in corners go third. Bass energy accumulates in room corners because that’s where all three room modes overlap simultaneously. Floor-to-ceiling bass traps in the front corners address this most effectively. The improvement is felt rather than heard: tighter, better-defined low end with fewer one-note bass problems.
Ceiling treatment (if not already covered in first reflections) adds a layer of RT60 control without the large floor footprint of wall panels.
Floor treatment typically takes care of itself. Carpet and a thick pad provide meaningful absorption, and most home theaters already have both.
More detail on the interaction between these strategies is in the diffusion vs absorption guide.
What Professional Calibration Adds
DIY acoustic work can get you far. Software like REW, a calibrated measurement microphone, and patience will surface most problems and verify that your treatments are working. But there are limits.
A professional acoustician brings specialized measurement equipment, experience across hundreds of rooms, and the ability to identify problems that aren’t obvious in a basic RT60 sweep. They can take spatial impulse response measurements across multiple listening positions and identify where modes and reflections converge in ways that generic online calculators miss. They understand the interaction between speaker placement, listening position, treatment placement, and remaining room geometry as a system rather than isolated variables.
For a purpose-built dedicated theater, professional acoustic design before construction is significantly more cost-effective than retrofitting problems after the room is built. Changing the room’s dimensions, ceiling height, or wall angles during construction costs a fraction of what it costs after the concrete is poured. An acoustician can specify dimensions that avoid the worst modal stacking from the start, which is something no amount of panels can replicate after the fact.
For existing rooms, a professional acoustic consultation identifies which remaining problems are treatable and which are structural limits of the space. That’s a useful thing to know before spending money on gear.
Getting Started
Start with a room mode calculator and your room’s three dimensions. Find where the modes stack up. Take an RT60 measurement with REW if you have a measurement mic; if not, the clap test and the flutter echo listen will tell you what you’re dealing with. Address first reflection points and corners before touching anything else. Then measure again.
The room is the system. Understanding it at this level changes what decisions make sense and reveals where money is actually worth spending.