Surround Sound in Small Rooms: Making 5.1 and Atmos Work Under 200 Sq Ft
Small rooms do not forgive bad decisions. Set up a full 5.1 system in a 10x12 space without thinking it through, and you end up with smeared surround imaging, booming bass that turns every action sequence into mud, and surround speakers so close they drown out the front soundstage. The room is working against you in ways it simply would not in a larger space.
That does not mean you cannot have a genuinely good surround experience under 200 square feet. It means you have to make different choices than the ones optimized for a 20x15 dedicated theater. The right speaker configuration, proper sub placement, calibration software, and a small amount of acoustic treatment can produce results that rival setups twice the size. Here is what actually works.
Why Small Rooms Create Specific Problems
In a large room, the direct sound from your speakers reaches your ears well before reflections bounce off walls and return. You get roughly 15 to 20 milliseconds of separation, which is enough for your auditory system to process the direct signal cleanly. In a room under 200 square feet, that delay collapses to 4 to 8 milliseconds. Reflections arrive so quickly they smear into the direct sound rather than adding spaciousness.
Bass modes are the other major problem. Every room has resonant frequencies determined by its dimensions. In smaller rooms, those frequencies are spread far apart and hit harder. A room that is 10 feet wide has a strong axial mode at around 56 Hz. A room 12 feet long has one near 47 Hz. When bass content in a film or music track hits those frequencies, you get pronounced peaks that can be 10 to 15 dB louder than adjacent frequencies. Your subwoofer sounds great on some material and oppressive on others, depending entirely on whether it is exciting those modes.
The third problem is surround proximity. Full 5.1 guidelines call for rear surrounds placed at roughly 110 to 135 degrees from the listening position. In a small room, you may be sitting 3 feet from those speakers. At that distance, the surrounds do not blend into an ambient field. They become isolated point sources, and you hear them as separate speakers rather than as envelopment. The surround channels exist to create atmosphere, not to announce their presence.
The Right Configurations for Small Rooms
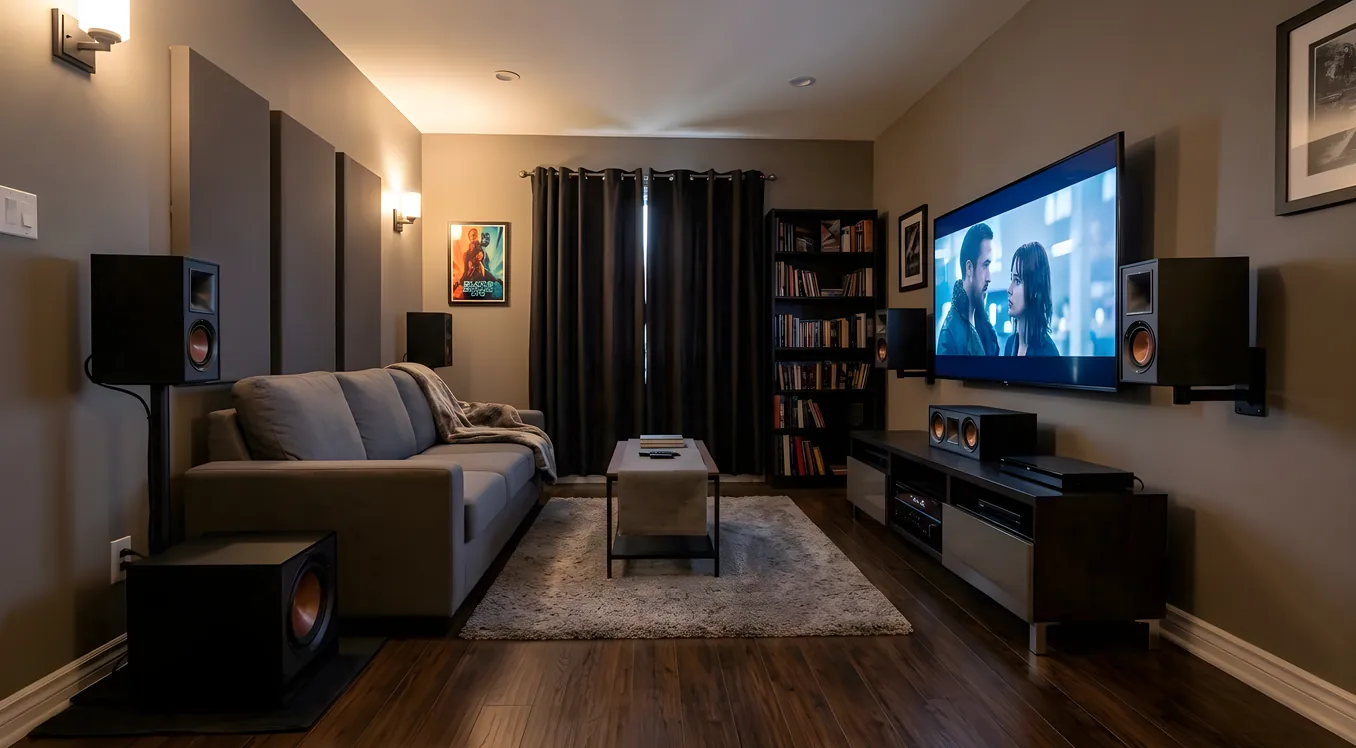
Skipping rear surrounds is often the correct call in a room under 180 square feet. A 3.1 system (left, center, right, subwoofer) gives you a tight, well-controlled soundstage with no rear imaging problems. For Atmos, a 3.1.2 layout adds two height speakers and keeps the surround field overhead rather than pushing you too close to side or rear channels. The height layer is actually less problematic in small rooms because ceiling-mounted or upward-firing speakers are not competing at ear level.
A 5.1 system can work if you limit it to side surrounds only, placed at 90 degrees from the listening position rather than the full 110 to 135 degrees. This means the surrounds are beside you, not behind you, and the proximity problem is reduced because you are not sitting two feet in front of them. For full Atmos in a small space, 5.1.2 (side surrounds plus two heights) performs noticeably better than 5.1.4 or 7.1 configurations where the rear channel positions are physically unworkable.
What you lose by skipping rears is primarily rear-panning effects during action sequences. What you gain is a coherent soundstage without surround localization artifacts, which matters far more for 90 percent of content. Read more about the full tradeoffs between layout options in our overview of surround sound configurations.
Speaker Selection in Tight Spaces
Bookshelves over towers is the correct default for small rooms, and not just because of size. Towers typically have lower bass extension, which sounds appealing on paper but actively makes small room acoustics worse. More bass extension means more energy feeding into your room’s problem frequencies. Bookshelves that roll off below 80 Hz let you hand that energy to the subwoofer, where you can manage it with placement and EQ.
For the front three speakers, matched cabinets from the same product line matter more in a small room than in a large one. The imaging collapses across the front stage if your left, center, and right speakers have different tonal signatures. Your center channel specifically should be a dedicated center, not a bookshelft placed on its side. Horizontal center designs that place the tweeter off-axis from the woofers cause comb-filtering artifacts that are audible in dialogue-heavy content.
For height channels in a 3.1.2 or 5.1.2 setup, compact in-ceiling speakers beat upward-firing modules in most small room configurations. Upward-firing Atmos modules rely on ceiling reflections to create the height effect, and in low-ceiling rooms (8 feet or under), those reflections arrive too quickly to work as intended. A direct-firing in-ceiling speaker aimed at the listening position gives you height imaging that actually comes from above rather than from a ceiling smear 6 inches above your speakers.
Subwoofer Placement
Corner placement is the most common subwoofer position in home theaters, and it is usually wrong for small rooms. Corner loading increases output by coupling the sub to room boundaries on multiple sides. In a large room, that extra output is welcome. In a small room, it amplifies the room modes you are already fighting and creates peaks that no amount of EQ can fully correct.
The most consistently effective position in small rooms is mid-wall on the longest wall. Placing the subwoofer at the midpoint of a wall excites the room modes at that frequency less severely, because you are not feeding bass energy into the corners where modes build. Some engineers refer to this as wall-center placement, and it is underutilized because it requires routing a cable across the room or using a wireless sub transmitter.
A second approach worth trying in rooms under 150 square feet is the subwoofer crawl. Place the sub at your primary listening position. Play bass-heavy material and walk around the room listening for the smoothest, most consistent bass response. Mark that spot. Move the sub there. It sounds like a cheat, but it is grounded in acoustic physics: the position with the smoothest response at the listening position is the position that minimizes standing wave excitation at that seat.
Why Room Correction Matters More Here
Room correction software is useful in any space, but in a small room it is less optional. The bass mode problems described above are severe enough that without measurement-based EQ, you are essentially guessing at balance.
Audyssey MultEQ (found in most Denon and Marantz receivers) works reasonably well if you run it properly. Take measurements at multiple positions rather than the single required measurement, and let the software average them. The multi-position approach gives it better data to flatten the modal peaks. Audyssey’s Dynamic EQ is worth leaving on for small spaces because it compensates for low-volume listening, which matters more when you are keeping levels down in a smaller room.
Dirac Live is meaningfully better, particularly for bass correction. Its sub-bass optimization handles low-frequency room modes with more precision than Audyssey, because it allows for both amplitude and time-domain correction simultaneously. If your receiver supports Dirac Live (several NAD, Arcam, and StormAudio products do, along with newer miniDSP processors), the improvement in bass coherence in a small room is audible. Our full breakdown of measurement-based processors is in the room correction guide.
Room correction handles the frequency domain. It does not fix the reflection problems that create smearing at mid and high frequencies. That requires acoustic treatment.
Acoustic Treatment Priorities
You do not need to turn a small room into a recording studio. Two targeted treatment types address the problems that matter most for surround sound.
First reflection points are the highest priority. These are the positions on the side walls, ceiling, and rear wall where sound from your front speakers reflects toward the listening position. Find them with the mirror trick: sit in your listening position while someone slides a mirror along the side wall. Wherever you can see a speaker in the mirror is a first reflection point. Placing a 2-inch acoustic panel at each of these positions absorbs the early reflections that cause frequency smearing. Four to six panels typically cover the critical positions in a 10x14 room.
Bass traps in corners are the second priority. Thick, low-density absorptive material in room corners (particularly floor-to-ceiling in vertical corners) reduces modal buildup. Rigid fiberglass or mineral wool at 4 inches or more of thickness works better than light foam at any thickness. Foam works for mid and high frequencies; it does not absorb bass. The corners do not need to be fully packed, but floor-to-ceiling treatment in two or three corners makes a measurable difference in the 80 to 120 Hz range where modes are most problematic in typical small room dimensions.
Our small room theater design guide covers material specifications, placement diagrams, and what to skip if you are working with a limited treatment budget.
Speaker Distance and Level Calibration
Even with a well-chosen configuration, small room setups need calibration that accounts for the compressed distances. Set all speaker distances accurately in your receiver’s setup menu. In a standard room, left and right speakers might be 9 to 10 feet from the listening position. In a small room, they might be 6 feet. Your receiver applies time delay based on those distances to synchronize arrivals, and wrong distances produce phase problems that degrade imaging.
Use your receiver’s built-in SPL meter or a calibrated app like SPL Meter Pro during the automated calibration process. The automated levels from Audyssey or similar systems are generally accurate for the front three channels. Check the surround levels manually afterward: small rooms often result in calibrated surrounds that are still subjectively too loud because the proximity amplifies their presence. Pulling the surrounds back 2 to 3 dB from calibrated levels frequently produces better balance.
Crossover settings matter more in a small room. The default 80 Hz crossover is a reasonable starting point, but small rooms often benefit from setting the front speakers’ crossover higher (100 to 120 Hz) so less bass energy is radiated into the room from multiple locations. With a single subwoofer, bass management is simpler and placement optimization has more impact.
Three Room Configurations That Work
A 10x12 dedicated room works well with a 3.1.2 setup: compact bookshelves at the front left and right positions, a slim center channel under or above the display, two small in-ceiling speakers for height, and a sealed 10-inch subwoofer mid-wall on the 12-foot side. Two acoustic panels at each first reflection point and corner bass traps keep the acoustics manageable. Dirac Live handles the remaining frequency correction.
An 11x14 room is large enough to accommodate a 5.1 layout with side-only surrounds. The surrounds go at 90 degrees from the primary listening position and are pulled back in level slightly from calibrated settings. A single subwoofer at mid-wall on the long axis, combined with Audyssey MultiEQ XT32 on a capable AV receiver, handles the bass management. At this size, a modest front L/R with 6-inch woofers typically avoids the worst modal buildup without needing aggressive EQ.
A 12x16 room sits at the edge of what qualifies as a small room and allows for either 5.1.2 or, at a stretch, a conservative 7.1 layout if the rear walls are treated. In this size, the full 5.1.2 configuration with ceiling heights and side surrounds produces genuine Atmos performance rather than compromised small-room Atmos. The longer dimension helps because the rear speaker positions are now far enough away that proximity ceases to be the dominant problem.
Getting the Most Out of a Constrained Space
The instinct with a small home theater is to treat limitations as problems to be overcome with more speakers, a bigger subwoofer, or a more powerful receiver. That instinct is usually wrong. A smaller, better-matched configuration with proper calibration and targeted treatment consistently outperforms an oversized system in a room that cannot accommodate it.
Your room is the largest variable in the system. Understanding how it behaves acoustically (and building your speaker and subwoofer choices around that behavior rather than against it) is what separates a frustrating listening experience from one that makes a tight space genuinely rewarding.