Bonus Room Home Theater: Working With Odd Shapes and Shared Space
Bonus rooms are appealing home theater candidates precisely because they sit apart from the main living areas: above a garage, tucked at the end of a second-floor hallway, or carved out of an attic. That separation means less noise bleed, a door you can close, and neighbors less likely to complain about your subwoofer. The catch is that these spaces rarely cooperate. Sloped ceilings, knee walls, L-shaped footprints, dormers, and double-duty furniture requirements are the norm, not the exception.
None of those constraints are dealbreakers. They do require a different planning sequence than a standard rectangular room would.
Sloped Ceilings: Reframe the Problem First
The instinct when facing a sloped ceiling is to fight it: find the tallest point and try to build a traditional theater layout around it. That approach almost always disappoints. A better starting point is to identify where the ceiling gives you the most usable height and work backward from there.
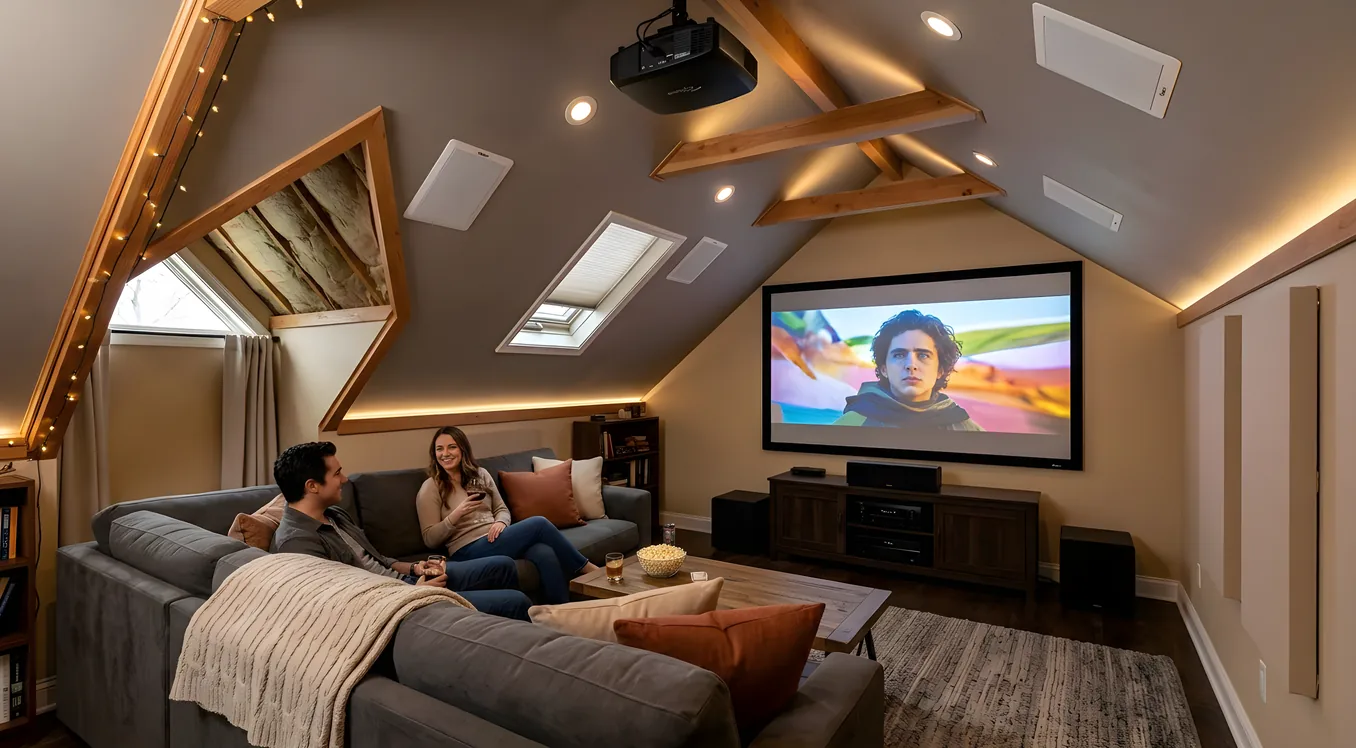
In most bonus rooms over a garage, the ridge runs down the center and the ceiling slopes to knee walls on both sides. That means the back half of the room, if your seating faces the right direction, often has adequate height for rear surrounds and even a few rows of seats. The screen wall, however, ends up being the short wall at one end where the slope drops quickly.
Mounting your screen on a knee wall rather than a full-height wall is the standard fix, and it works well. A 100-inch screen can sit comfortably on a knee wall that starts at 48 inches high if you keep the bottom of the screen close to seated eye level. The wall doesn’t need to go all the way to a standard 8-foot ceiling. What matters is that the screen face is perpendicular to viewers and free from obstructions.
Projector placement follows from screen placement. With a short front wall and a sloped ceiling, a shelf mount on the rear or side wall often works better than a ceiling-drop mount. A UST (ultra-short-throw) projector sitting on a credenza or low shelf against the front wall sidesteps ceiling mount complications entirely. UST projectors require almost no throw distance, which makes them particularly useful when the ceiling above where a traditional projector would hang is too low or too sloped for a standard mount.
Atmos in a Room That Won’t Accept Ceiling Speakers
Dolby Atmos relies on height channels to create overhead audio, which normally means in-ceiling speakers. A sloped ceiling doesn’t cooperate: the angle sends sound in the wrong direction, and cutting into sloped drywall creates installation headaches.
The practical solution is on-wall height speakers positioned high on the front and rear walls, angled downward slightly. These are labeled as “height” or “elevation” speakers by most manufacturers and designed for exactly this scenario. They won’t replicate the pure overhead effect of flush-mounted ceiling speakers in a flat-ceiling room, but they get closer than you’d expect and require no structural modifications beyond wall mounting.
Atmos-enabled upward-firing modules placed on top of existing floor-standing or bookshelf speakers are another option. They bounce sound off the ceiling above them, which only works well when that portion of the ceiling is relatively flat and close to perpendicular. Check ceiling angle before committing: if the section above your front speakers slopes more than 15 to 20 degrees, upward-firing modules underperform.
For a 5.1.2 Atmos configuration in a bonus room, the most reliable approach is usually two on-wall height speakers on the front wall (positioned at roughly 45 degrees up from ear level) combined with traditional surrounds on the side walls where ceiling height is workable.
Odd Shapes: L-Plans, Alcoves, and Dormers
An L-shaped bonus room looks problematic on a floor plan. In practice, it often creates a natural separation between the viewing zone and a secondary area, which is an asset if you use it that way. The leg of the L that’s narrower or less rectangular becomes the casual seating area, game zone, or equipment storage. The main rectangular section becomes the theater.
The mistake is trying to use the full L as a single viewing space. Sound distribution across an L-shape with a single speaker array is nearly impossible to get right. Carve out the rectangle, define it with your speaker placement and seating, and treat the remaining space as functionally separate.
Dormer windows create a different challenge: they interrupt wall surfaces that would otherwise hold surrounds or equipment, and they let in light during daytime viewing. Blackout shades are mandatory for any dormer in a theater space. A motorized roller shade for each dormer, spec’d for total blackout rather than light filtering, resolves the light issue entirely. For speaker placement, dormers can often be used as natural alcoves for equipment or smaller satellite speakers if the geometry works out.
Alcoves off the main room are underused assets. A deep alcove is a natural equipment rack location, keeping gear out of sight and reducing the visual clutter that makes shared spaces feel unfinished.
Shared Space: Making a Room Pull Double Duty
Not every bonus room can be permanently dedicated to home theater. If the space also serves as a guest bedroom, playroom, or family gathering space, the theater elements need to coexist without dominating the room when the screen is off.
The single most effective tool here is a motorized retractable screen. A ceiling-recessed motorized screen disappears completely when not in use. The wall behind it can hold a piece of art, a TV, or simply remain blank. Combined with a projector on a ceiling mount (standard or short-throw depending on room depth), the whole system becomes invisible until you pull it down. For shared spaces, this is a significantly better outcome than a fixed-frame screen that’s always present and always defines the room.
Furniture placement in shared spaces tends to be more fluid than in dedicated theaters. Modular sectional seating that reconfigures easily is more practical than fixed recliner rows. If you’re using a UST projector on a credenza, the credenza serves as both equipment housing and functional furniture. The projector stays in place, the screen retracts overhead, and the room returns to general use without any moving of heavy components.
Fixed versus motorized screen tradeoffs are worth understanding before you commit: fixed frames produce a slightly better image for the same dollar because the tension is more consistent, but that advantage only matters in a room where the screen is always in view and always in use.
Acoustic Treatment Without Ruining the Room
Acoustic panels in a dedicated theater can be as utilitarian as you want. In a shared space, they need to look intentional. The good news is that the design world has largely caught up: fabric-wrapped panels in geometric shapes or custom prints are a legitimate interior design choice now, not an afterthought.
For a bonus room, prioritize treatment on the wall behind the seating (the rear wall) and the two side walls at the primary reflection points (roughly at the same horizontal position as the main speakers). These locations capture the reflections that most damage dialogue intelligibility and stereo imaging. You don’t need full-wall coverage.
A large area rug is the single highest-impact acoustic addition for a room with hard floors. It reduces flutter echo and softens the low-mid buildup that makes dialog sound muddy. In a shared space, a rug is also completely unremarkable as a design element.
Bookshelves filled with varied objects (books of different heights and depths, decorative items, plants) function as diffusers. This is one place where the “it looks like a real room” constraint and the acoustic goal align perfectly. A bookshelf wall on one side of the room scatters sound in a way that reduces harsh reflections without the visual weight of formal acoustic panels.
For a small or constrained room, acoustic treatment priorities shift toward bass management: corner placement of bookshelves or dedicated bass traps in the corner junctions between floor and wall makes a bigger perceptual difference in a small space than high-frequency absorption does.
Noise Between Floors
Bonus rooms are typically on the second floor, which means whatever is happening below them matters for both transmission directions. Subwoofer output travels down through the floor and into the first floor ceiling. Footstep impact noise travels the same path in reverse. Neither is entirely solvable with surface treatments alone.
For subwoofer vibration, isolation feet or pads under the sub reduce the mechanical coupling between the speaker and the floor. This doesn’t eliminate the problem but reduces the most objectionable low-frequency transmission. Placement matters: a sub sitting in the corner of the room couples more strongly with the structure than one pulled slightly away from the walls and elevated on foam or rubber pads.
If the space below the bonus room is a garage (common configuration), you have more latitude since the garage ceiling doesn’t need to support a quiet living space. If it’s a finished room, the trade-off between subwoofer level and household peace is real, and an SVS SB-series or similar sealed subwoofer with a gentler roll-off characteristic is easier to live with at lower volumes than a ported sub that peaks hard in the 30-50 Hz range before dropping off sharply.
Speaker Placement With Constrained Furniture Layout
Surround speaker placement in a bonus room often gets compromised by where furniture can go. The ideal positions (90 degrees to the side at listening height for 5.1, slightly behind for 7.1) conflict with doorways, knee wall obstructions, and the need to circulate through the room.
Ceiling-mounted surrounds are a practical solution when wall mounting at the correct height isn’t possible. Pointing down and angled slightly toward the primary listening position, they produce a diffuse surround effect that works well for most film content. For music or critical listening, ceiling surrounds are less accurate than properly placed wall speakers, but for a room where the layout is constrained, the trade-off is usually worth it.
Wireless surround speakers deserve a mention for shared spaces where running speaker wire through walls isn’t practical. Several AV receivers now support wireless surrounds over a proprietary protocol. The audio quality gap versus wired has narrowed substantially; the primary remaining objections are latency (minor on current implementations) and the need to power the wireless speakers independently.
Equipment Concealment
A bonus room theater that looks polished keeps equipment out of sight. A closet adjacent to the main room, or even a knee wall access hatch leading to attic space, can house a rack-mounted AV receiver, streaming devices, and a UPS without any of it appearing in the viewing space. HDMI over fiber or balun extenders carry signal runs of 50 feet or more reliably, so equipment doesn’t need to be close to the display.
For rooms without a nearby closet, a furniture-integrated approach works well. A credenza or media console with ventilated rear panels conceals components at the front of the room. Cable management from the credenza to wall-mounted speakers runs through in-wall conduit or raceways painted to match the baseboard.
The UST projector-on-credenza configuration mentioned earlier has a natural equipment concealment benefit: the AV receiver, streaming devices, and switching gear all live inside or directly below the same piece of furniture as the projector. Everything connects at close range, and the only wire that needs to run across the room is the screen trigger cable and speaker runs.
Putting It Together
A bonus room becomes a genuine home theater when the planning starts with the room’s actual geometry rather than fighting it. Sloped ceilings prefer a knee-wall screen placement and a shelf-mounted or UST projector. Atmos in these rooms works best with on-wall height speakers rather than in-ceiling. Odd shapes get resolved by carving out a dedicated rectangular viewing zone and using the remainder purposefully.
For a deeper look at how a bonus room theater compares to a fully dedicated theater vs. media room setup, the tradeoffs around room control, acoustic isolation, and equipment investment become clearer when you see them side by side. The bonus room sits somewhere between those two poles: more control than an open living room, less than a purpose-built dedicated space, and often the right answer for households that want serious audio and video without permanently committing a room to one use.