Electrical Planning for Home Theaters: Circuits, Outlets, and Surge Protection
Electrical Planning for Home Theaters: Circuits, Outlets, and Surge Protection
Most home theater problems that show up as audio or video issues are actually electrical problems. Ground hum, unexplained reboots, projector lamp failures, and premature equipment death often trace back to inadequate circuits, shared grounds, or unprotected power. Getting the electrical right before you mount a display or pull cable is the single highest-leverage thing you can do in a theater build.
This guide covers what the NEC requires, what experienced installers actually do, and how to protect the equipment you spent serious money on.
How Many Dedicated Circuits a Home Theater Needs
A dedicated circuit is one that serves only your theater equipment, with its own breaker and its own run of wire back to the panel. Sharing circuits with other loads invites noise from motors, HVAC compressors, and light dimmers that can show up as audible hum or visible interference.
Basic theater (2 dedicated circuits): One 20A circuit for AV equipment (receiver, streamer, Blu-ray, gaming console), one for lighting and general-use outlets. This is the floor, not the goal.
Mid-range theater (3 dedicated circuits): Separate the amplification load from source components. Amplifiers, especially multichannel receivers driving large speakers, draw surge current at startup that can pull voltage down on the same circuit as your projector or display. Adding a third circuit for lighting also means dimmer noise never reaches your AV gear.
High-end theater (4+ dedicated circuits): Break it down further: amplification, projector, lighting, general (sub, center channel amp, charging). Some installers add a fifth for the equipment rack if it contains class-A amplification or anything that runs hot. The more you separate loads, the less opportunity for one device to introduce noise into another’s power supply.
All dedicated circuits for AV equipment should be 20A (12-gauge wire, 20A receptacles or isolated ground outlets). Running 15A circuits to save on wire cost is a common builder shortcut that creates headaches later.
Outlet Placement: Where to Put Them
Outlet location is one of those things you can fix afterward only with serious work. Rough-in is the time to get this right.
Behind the screen wall: You need outlets at the bottom of the screen wall for a powered subwoofer and any center channel amplifier that’s rack-separated from the main unit. If you’re installing an acoustically transparent screen with in-wall speakers, factor in speaker-level connections and any separate amplification they require.
At the projector location: A ceiling outlet (or high wall outlet, depending on throw distance) at the projector mounting point keeps the power cord from running exposed along the ceiling. Some installers also run a USB-A outlet here to power a projector mount LED or IR repeater.
Behind the seating area: USB-A/C charging outlets at seat height on the rear wall (or in a low wall outlet behind a sectional) handle phone charging without running cables across the floor. A standard duplex outlet here also gives you a place to plug in a rack extension if equipment ever migrates.
At the equipment rack: This is where most of your load sits. If you’re using a rack-mounted power conditioner (which you should be), one 20A outlet feeding the conditioner is cleaner than daisy-chaining multiple strips. Some integrators run two circuits to the rack location and feed the conditioner from one while leaving a second for maintenance work.
Recessed outlets behind wall-mounted displays: A recessed outlet box sits flush with the wall surface and lets you plug in a flat-mount TV without a cord gap or an in-wall power kit. Most have a single 15A outlet and a knockout for HDMI/USB pass-through. These require their own NEC-compliant circuit; you cannot just extend an existing outlet into the wall cavity behind a display.
Isolated Ground Outlets
Standard outlets share a ground reference that other devices in the building also use. Every motor, dimmer, and switching power supply on that shared ground can inject noise into your signal chain. Isolated ground (IG) outlets, identifiable by their orange color and triangle marking, run a dedicated ground conductor all the way back to the panel’s ground bus, bypassing the conduit ground entirely.
The result is a cleaner ground reference for sensitive audio equipment. If you have a persistent hum that isn’t coming from a ground loop (see below), IG outlets on the AV circuit often eliminate it. They cost about twice as much as standard outlets and require isolated ground receptacles at the panel end, but the wiring approach is straightforward for any licensed electrician.
IG outlets don’t fix every noise problem, and they’re not a substitute for proper shielding or balanced connections. They’re most effective for sensitive analog signal paths: phono preamps, balanced line-level connections, and active crossovers.
Surge Protection: Two Layers
A whole-house surge protector at the main panel catches large transient events (lightning strikes on the service drop, utility switching events) before they propagate through your home’s wiring. These devices clamp at the panel and dissipate surge energy before it reaches branch circuits. Good ones are rated in the $200-$400 range and include MOVs rated for tens of thousands of amps. This is not optional if you’re running a theater with five-figure equipment costs.
A whole-house surge protector does not replace equipment-level protection. Panel-mounted devices handle the big events; they don’t filter the smaller, sustained noise that makes it through on your branch circuits. That’s what a rack-mounted power conditioner does.
Power Conditioners: What They Actually Do
Power conditioning products have a reputation for marketing claims that outrun their actual performance. Here’s a clear-eyed breakdown.
What they actually do: Filter high-frequency noise on incoming AC, provide sequential power-on delay (so the amp comes up after the processor, not simultaneously), offer current limiting that protects against small surges and voltage spikes, and organize your rack’s power connections behind a single managed outlet strip.
What they don’t do: Power conditioners cannot correct sustained low voltage (brownouts) or increase available amperage. A conditioner does not generate power; it conditions what arrives. If your incoming voltage runs 108V during peak demand periods and your amp spec’d for 120V, a conditioner won’t fix that. A power regenerator (a separate and more expensive category) converts incoming AC to DC and back, producing a clean fixed-voltage output regardless of what comes in.
Furman Elite-15 PFi: Furman’s Linear Filtering Technology (LFT) uses isolation transformers and common-mode noise filtering together. The PFi models are genuinely different from basic surge strips with a conditioner badge. They reduce noise floor measurably in sensitive analog systems and include Series Multi-Stage Protection (SMP) that doesn’t sacrifice itself during a surge, unlike MOV-only designs.
Panamax M5400-PM: Similar tier to Furman’s professional line. Includes Automatic Voltage Monitoring (AVM) that shuts down connected equipment if incoming voltage falls outside a safe range, then restores power automatically when voltage normalizes. Useful if your service entrance is prone to sags.
SurgeX: SurgeX units use a different protection topology (impedance-based rather than MOV-clamping) that doesn’t degrade after a surge event. MOV-based protection loses effectiveness each time it clamps a large transient; SurgeX components don’t sacrifice themselves the same way. Higher cost, strong preference in commercial and touring AV installations.
For most home theaters, a mid-range Furman or Panamax conditioner paired with a whole-house surge protector at the panel covers both layers without over-engineering it. Budget conditioners from off-brand manufacturers that claim massive joule ratings should be treated skeptically: joule ratings measure how much energy an MOV can absorb before it fails, not how well it protects your equipment.
UPS for Projectors
Lamp-based projectors have a specific vulnerability: cutting power mid-operation damages the lamp and can shorten its life significantly. Modern projector lamps run at high pressure and temperature; they need a cool-down period with the fan running before power is removed. A sudden outage skips that cool-down.
A UPS (uninterruptible power supply) addresses this. When grid power drops, the UPS switches to battery instantly and keeps the projector running long enough to complete a controlled shutdown. For most lamp projectors, two to three minutes of runtime is sufficient for a full cool-down sequence.
UPS sizing for projectors: look at the projector’s power draw (typically 250-400W for a 1-chip DLP in a home theater) and select a UPS with enough VA rating to support that load for at least five minutes at full brightness. A 1000VA/600W UPS handles most home theater projectors comfortably.
Native 4K laser projectors eliminate this concern since laser light engines don’t have the same thermal shock vulnerability. If you’re spec’ing a new build around laser projection, UPS is still worth having for clean shutdown capability but is less urgent.
The AV rack setup is also worth reviewing before you finalize your UPS placement and power sequencing plan, since the rack layout affects how easily you can reach power controls.
Ground Loops: Causes and Fixes
A ground loop happens when two pieces of equipment in a system have a different ground potential. Current flows between them through the signal cable’s shield (which connects both chassis), producing 60Hz hum (or 120Hz, depending on the configuration) in the audio.
Common causes:
- Equipment plugged into different circuits with different outlets (even within the same room)
- A cable TV or satellite coax connection that brings an external ground reference into the room
- Mixing balanced and unbalanced connections between equipment with different internal topologies
Cable and satellite coax is one of the most common ground loop sources in a theater. The coax shield is grounded at the utility pedestal, and that ground reference arrives in your room through the cable and connects to your receiver or cable box chassis. If your receiver has a different ground potential than the incoming coax, you have a loop.
Fix options, in order of preference:
- Plug everything into the same circuit (or the same power conditioner on the same circuit). This gives all your equipment the same ground reference.
- Ground loop isolator on the coax. A coax ground loop isolator breaks the DC path on the cable while passing the RF signal. $15-40, installs in line on the coax feed.
- Isolation transformer on the audio output of the affected component. Useful when you can’t isolate the cable connection or when the loop is coming through an analog audio path.
- Balanced connections. If your equipment supports XLR outputs (common on higher-end receivers and processors), balanced connections reject common-mode noise by design, including most ground loops.
For the full wiring approach that addresses these issues during rough-in, the home theater wiring guide covers conduit planning, cable types, and termination that make ground loop troubleshooting less likely after the fact.
NEC Code Considerations
The National Electrical Code has specific requirements that affect theater rooms depending on where they’re located in the house.
AFCI (Arc-Fault Circuit Interrupter) requirements: The 2020 NEC requires AFCI protection for circuits in bedrooms, living rooms, dining rooms, kitchens, and most finished living spaces. If your theater is a converted bedroom, bonus room, or any sleeping area adjacent room, your electrician will need to use AFCI breakers or AFCI outlets. Standard arc-fault breakers occasionally nuisance-trip with certain power conditioners and switching power supplies. Discuss this with your electrician and select AFCI breakers from a manufacturer that tests well with AV loads.
GFCI (Ground-Fault Circuit Interrupter) requirements: Basement theaters and garage conversions require GFCI protection. GFCI outlets and breakers detect current imbalance between hot and neutral and trip at 5mA, which is a very low threshold. Class-A amplifiers, power conditioners, and some projectors have capacitive leakage to ground that can trigger GFCI nuisance trips. If you’re installing GFCI-protected circuits in a basement theater, test each piece of equipment individually after energizing to confirm no nuisance tripping before finalizing the installation.
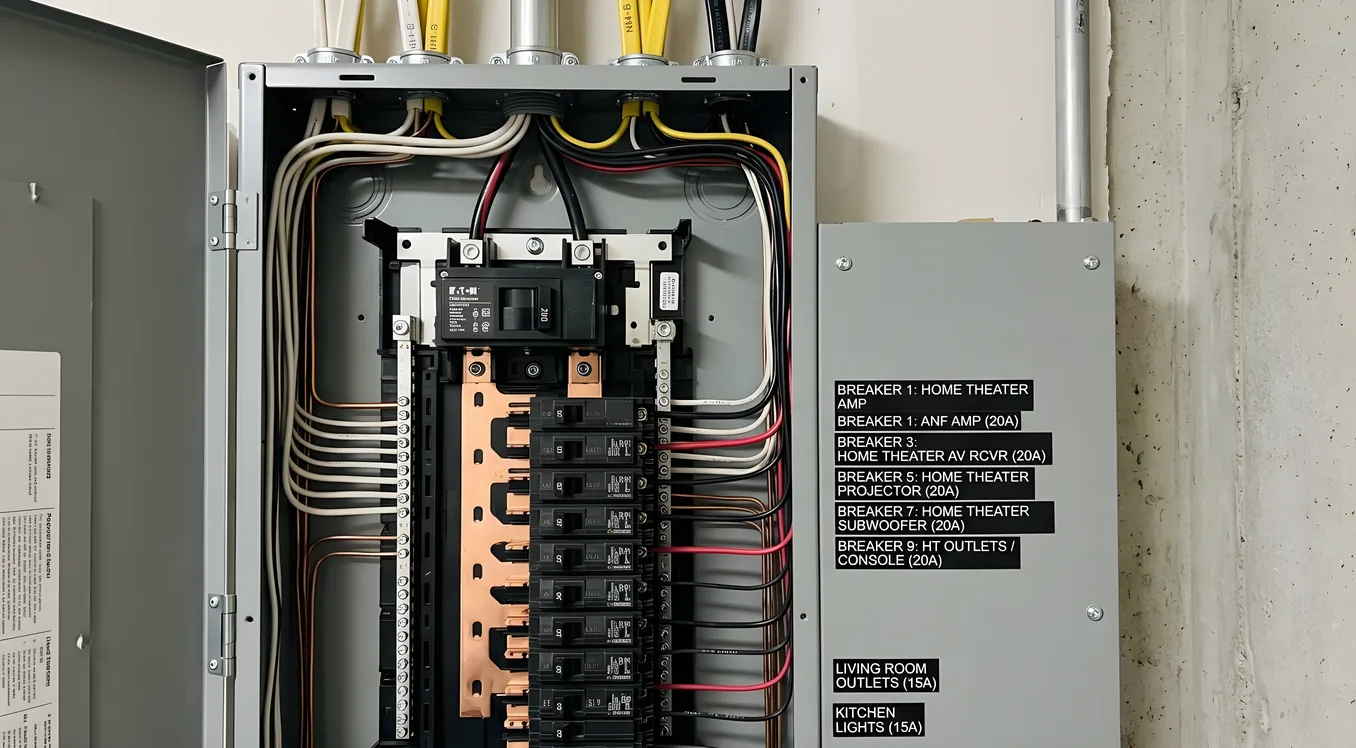
Dedicated circuit labeling: NEC 408.4 requires all circuits to be labeled at the panel. Label your theater circuits clearly. When you’re troubleshooting a problem at 11 PM, knowing which breaker controls which circuit saves time and prevents the wrong breaker from being tripped during future electrical work.
If you’re building from the ground up, the new construction theater planning guide covers how to coordinate the electrical rough-in with HVAC, framing, and acoustic treatment so these systems don’t conflict.
Getting the Electrical Right Before You Close the Walls
The right time to plan home theater electrical requirements is before framing is closed, not after. Adding a dedicated circuit after drywall is finished means fishing wire through finished walls, which is expensive and disruptive. The cost difference between roughing in two circuits versus four during new construction or a major renovation is small relative to the total project.
A few things to sort out before your electrician starts the rough-in:
- Final equipment list (determines circuit count and outlet locations)
- Rack location (determines conduit path and circuit home run length)
- Projector mount location (determines ceiling outlet position)
- Seating layout (determines rear-wall outlet height and count)
- Panel capacity (determine if a subpanel makes more sense than running long circuits from a distant main panel)
An electrical plan that matches your actual equipment and layout is the foundation everything else sits on.