Home Theater Wiring: Pre-Wire, Retrofit, and Cable Planning
The wiring behind your home theater is the one part of the build that becomes nearly impossible to improve after the walls are closed. Get it right during construction and it costs you a few hundred dollars in materials and a weekend of work. Come back later with walls already finished and you’re looking at fishing cables through insulation, cutting drywall, patching, repainting, and still not getting what you would have had if you’d done it upfront. The infrastructure decisions you make before drywall goes up determine what’s achievable in that room for the next twenty years.
This guide covers pre-wire planning during construction, the cable types and quantities that belong in each location, conduit strategy for HDMI and future runs, labeling practices that save time at every stage, and retrofit approaches when you’re working with walls that are already closed.
Pre-Wire vs. Retrofit: the Real Cost Difference
Running cable during new construction or a remodel before drywall is inexpensive. The walls are open, the studs are exposed, you can drill through top and bottom plates without restriction, and you can run exactly what you need to every location in a straight line. Materials for a full home theater pre-wire typically run $200 to $400. Labor, if you hire it out, is minimal because access is easy and there’s nothing to repair afterward.
Retrofit is categorically more difficult. Once drywall is installed, every cable run requires either an accessible path (attic, crawlspace, or unfinished basement above or below) or physical fishing through closed walls. Fishing cable means drilling through plates and wall cavities you can’t see into, fighting insulation, working around fire blocking, and dealing with obstructions that weren’t visible when the house was designed. Every run that would have taken ten minutes during pre-wire can take an hour or more in retrofit. You also accept that some cable paths simply aren’t achievable without cutting and patching drywall, which adds repair and paint costs to every run.
The rule used to be “run what you need.” The better rule is “run more than you think you need, then run pull strings for the rest.” A second run of speaker wire to each position costs almost nothing when the walls are open. A second conduit costs almost nothing. Come back in five years to add ceiling speakers or a new display position and those extra runs are already there.
Cable Types for Each Location
A home theater pre-wire involves several distinct cable types, each serving a different function. Using the wrong cable type in a given location isn’t just inefficient; in some cases it creates safety and code issues.
Speaker wire for in-wall runs must be rated CL2 or CL3 (CL3 is the higher rating and is acceptable anywhere CL2 is required, but not vice versa). These ratings indicate the cable has been tested for in-wall installation and meets fire resistance standards under the National Electrical Code. Standard lamp cord or bulk wire without a CL rating is a code violation inside a wall. For runs under 50 feet, 16 AWG is adequate for most home theater applications. For runs over 50 feet, or for subwoofer feeds that may carry sustained high-current loads, move to 14 AWG. The most common configuration for surround speakers is 14/4 or 16/4 wire, meaning four conductors in one jacket. Four-conductor wire lets you run two channels to a single wall plate, which is practical for rear speakers that are close together or for positions that may eventually need a second driver.
Cat6 is the general-purpose data cable for every position in the room. Run at least one Cat6 to each display location, each equipment rack location, each control point, and each position where a streaming device, game console, or IP-connected component might land. Cat6 handles 10 Gbps at up to 55 meters and 1 Gbps at up to 100 meters, which means a single cable type serves every current data need and headroom beyond that. The projector position is frequently overlooked: projectors increasingly use IP control, some have ethernet ports for firmware updates, and the streaming devices that feed them benefit from wired network connections over wireless. Run Cat6 to the projector ceiling mount location. Run it to the rear wall at seating height for any rear-positioned streaming device or gaming setup. Run it to the equipment rack. When in doubt, pull a second one; the cost difference is minimal.
RG6 coaxial cable carries satellite, antenna, and cable TV signals. Even in rooms that use over-the-air antennas for a tuner or satellite for live sports, RG6 is the correct cable. Older RG59 has higher loss at higher frequencies and does not perform as well with modern distribution systems. A single RG6 run from the main distribution point to the equipment rack location handles antenna and cable inputs.
Conduit for HDMI is a different philosophy than pulling bare HDMI cable. Do not pull a bare HDMI cable and route it through the wall as a permanent installation. HDMI specifications have changed repeatedly (1.0, 1.4, 2.0, 2.1), connector form factors have shifted, and active HDMI cables that work at long distances have different electrical characteristics than passive ones. The cable you need in ten years will not be the cable available today. What doesn’t change is the path through the wall. Run a 1-inch EMT conduit or a 1-inch flexible liquidtight conduit from each display location to the equipment rack. Terminate each end with a low-voltage wall ring or an old-work low-voltage bracket with a brush opening. Leave a pull string in the conduit. You can then pull whatever HDMI, optical, USB-C, or future cable type you need through that conduit at any point without opening a wall. For bundled routes carrying multiple conduit runs side by side, move to 1.5-inch for a two-conduit bundle or 2-inch for trunk sections that serve multiple branch locations.
18/2 wire for control and IR is used for IR emitter feeds, 12V trigger connections between components, and low-voltage control bus wiring for automation systems. This is a smaller, more flexible wire than speaker cable and is appropriate for the low-current signals involved. Where you’re not sure what control wiring will be needed, running a single 18/2 alongside the conduit and Cat6 at each position gives you a control path without additional wall work later.
Home Run Topology: Why Star Wiring Beats Daisy Chain
Every cable in a home theater pre-wire should home run directly back to the equipment rack or the central wiring closet. This is called star topology or home run wiring. You pull individual cables from each speaker position, display location, and control point and run them to a single central location where all terminations happen.
The alternative is daisy chain wiring, where the first speaker connects to the receiver, the second speaker connects to the first, and so on around the room. Daisy chaining saves wire in the short run but creates several problems. If a connection at any point in the chain fails, everything after it fails. You cannot independently control or test individual legs. Speaker wire run in a daisy chain configuration also produces voltage drop that compounds over longer total distances. For networked runs like Cat6, daisy chaining is technically an Ethernet violation; Ethernet requires point-to-point runs, not chain connections.
Home run wiring means you use more cable total, but every run is independent. You can troubleshoot a single leg without affecting any other. You can swap a cable that turns out to be defective without rewiring the system. You can repurpose a run if the room layout changes. The equipment rack becomes the single point where all connections happen, which is also where you want them when it comes to gear swaps, maintenance, and system expansion.
Plan the equipment rack location first. Everything else in the room home runs to it. If the rack is in a closet adjacent to the theater, all wires pass through the shared wall. If the rack is on an interior wall of the theater itself, runs to positions on the same wall are short and runs to the far wall and ceiling are longer but still direct.
Conduit Sizing and Pull String Protocol
The guidance for conduit runs is to size up from what you think you need. A 1-inch conduit is the minimum for a single HDMI path. If you’re running two cable types through the same conduit (HDMI and audio extraction cable, for example), use 1.5-inch. Main trunk lines that aggregate multiple branch runs use 2-inch conduit, which allows three or four cables to pass with room to work the pull string without binding.
Overfilling conduit causes two problems. First, pulling cables through a tightly packed conduit requires significant force, which can damage cables, particularly if the conduit has bends. Electrical codes limit conduit fill to 40% of interior cross-section for good reason. Second, an overfull conduit makes future pulls nearly impossible without removing the existing cables first.
Every conduit gets a pull string before the wall closes. Use either a conventional nylon pull string or a flat nylon pull tape rated for the conduit size. Tie the string to a stable anchor point at each end before the wall closes; a string floating inside a conduit with no anchor becomes impossible to retrieve once the wall is finished. When you pull a new cable through the conduit later, pull the string with it and immediately thread a new string behind the cable. This way you always have a pull mechanism for the next run.
Cat6 Run Planning
Cat6 serves more locations than most people plan for in an initial pre-wire. Work through each of the following positions before you’re done pulling:
The projector position needs Cat6 for IP control, firmware updates, and the streaming or media device that feeds it. Ceiling-mounted projectors sometimes use wireless streaming devices tucked behind or near the projector itself; those devices perform better on wired connections. Run Cat6 to within 6 inches of the intended projector mounting location.
The main display position (for rooms that use a flat panel rather than or in addition to a projector) needs Cat6 for the display itself and for connected streaming devices. Most displays include ethernet ports alongside HDMI; using the wired connection for firmware updates and IP control reduces wireless network congestion.
The equipment rack is the hub. Run multiple Cat6 cables here: at least one for the network switch that will be in the rack, additional runs for any IP-controlled components, and dedicated runs to the router and modem location if that equipment lives in the same space.
Control point locations where a touchscreen panel, keypad, or wall-mounted control interface will be installed need Cat6 for IP-based control systems. Even if you’re planning to use a simpler control solution today, leaving Cat6 at each control point keeps those options open.
Gaming or secondary use positions in the seating area may eventually need wired network drops for low-latency gaming connections. Pull Cat6 to the rear seating wall at a height accessible from a gaming console or streaming box positioned near the seating.
For the cables guide that covers termination, connectors, and performance verification once the room is assembled, the same principles apply: quality at the connector ends matters as much as the cable quality itself.
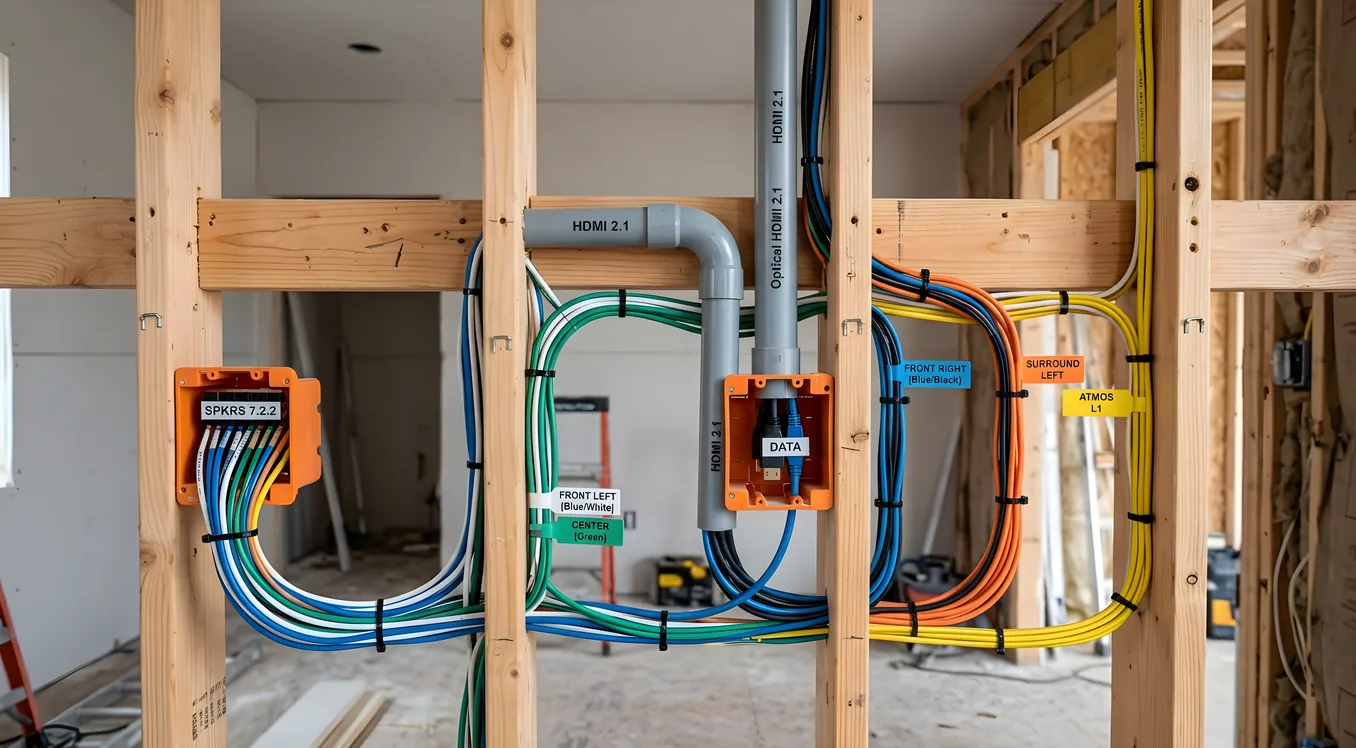
Labeling: Both Ends, Before the Wall Closes
Label every cable at both ends before the wall is closed. This is the single most time-saving practice in a pre-wire, and it’s also the one most frequently skipped under deadline pressure.
Use adhesive label sleeves designed for cable labeling, not tape. Tape labels fall off, the adhesive fails with age, and the handwriting on tape is often illegible within a few years. Cable-specific label sleeves fold around the jacket and stay in place indefinitely. For field-generated labels, a simple handheld cable label printer produces clean, permanent labels at low cost.
Develop a labeling convention before you start and stick to it. The simplest convention names each run by its destination and function: LSPKR-FL for left front speaker, CAT6-PROJ for the Cat6 run to the projector, HDMI-MAIN for the conduit pull string serving the main display. At the rack end, label every cable where it terminates. At the far end (behind the wall plate), label the cable before it disappears into the wall plate cutout.
Do not label only one end and assume you’ll figure out the other end later. In a rack with thirty cables entering from multiple wall locations, unlabeled cables at the rack end become a troubleshooting exercise instead of a simple connection task.
Retrofit Strategies When Walls Are Already Closed
Retrofit cable installation works through three main access paths: attic access from above, crawlspace or basement access from below, and direct wall fishing when neither overhead nor under-floor access is available.
Attic access is the cleanest retrofit path in one- and one-and-a-half-story construction where the theater is on the top floor or has an unconditioned attic directly above. You can run cables through the attic and drop them down through the exterior wall cavity or through interior walls if you can locate the top plates. The limitation is that many attics have blown insulation that complicates routing and makes finding the correct wall cavity challenging. A combination of a stud sensor from inside and a plumb bob from the attic helps locate where to drill.
Crawlspace access works for first-floor rooms over a crawl or unfinished basement. You enter from below, locate the wall cavities by tracing the sill plate, and push cables up through the bottom plate into the wall cavity to a low-voltage box cut in from the finished side. Crawlspace work is uncomfortable and often dirty, but it’s far more predictable than attic access for finding specific wall locations.
Direct wall fishing with fish tape, glow rods, and a drill is the tool of last resort when neither attic nor crawlspace access is available. A fish tape is a coiled steel spring tape that can be inserted through a hole cut in drywall and pushed through the wall cavity to another opening. Glow rods are fiberglass sections with a hook end that connect together for length and are flexible enough to navigate short bends. Old-work low-voltage boxes mount in existing drywall without requiring a stud and accept a pass-through plate or brush opening for the cables. The challenge in direct fishing is fire blocking: horizontal 2x4 blocking installed in wall cavities between floors creates an obstruction that stops a fish tape cold. You’ll need to cut an access hole at the fire block location, drill through it, and patch that hole afterward.
For the electrical planning work that accompanies a retrofit, coordinate your cable paths with the electrical contractor. New dedicated circuits for the equipment rack and display positions often involve similar access challenges, and running both at the same time reduces the total number of wall penetrations and patches.
Cable Pathway Planning Before You Pull
Draw the cable plan before pulling a single cable. A simple sketch showing each wall, each speaker position, each display location, and the equipment rack with labeled cable runs to each destination prevents both omissions and conflicts.
Mark the plate drilling locations on the studs. Where two runs need to pass through the same plate location, mark both before drilling so you can place a single larger hole rather than two separate holes that might weaken the plate. Sill plates and top plates are structural, and while a few small-diameter holes are not a concern, a cluster of poorly placed holes in the same location can be.
Planning also reveals bundling opportunities. Speaker wire and Cat6 can run through the same wall cavity and the same plate holes. HDMI conduit and Cat6 can share a path down the same wall. The only separation requirement is that low-voltage cables (speaker wire, Cat6) must maintain 6-inch separation from high-voltage electrical wiring where they run parallel, or be separated by a metal barrier where they cross. Running low-voltage and line-voltage cables in parallel in the same cavity creates noise interference potential and is prohibited under NEC guidelines.
Diagram each conduit separately from bare cable runs. A conduit is a permanent pathway; a bare cable run is fixed. Conduit routes for HDMI deserve their own planning consideration because they need to be sized and routed before other cables occupy the chase.
Future-Proofing Beyond the Known Cables
The cables you’re pulling today address today’s known needs. The pull strings in every conduit address future needs you can’t specify yet. Beyond that, there are a few additional practices that pay off over a long ownership horizon.
Run extra speaker wire to each position beyond what you’re currently planning to use. A second run of 16/4 to each rear corner adds fifteen minutes of work during pre-wire and eliminates any future retrofit work if you add a second speaker to that position or upgrade to a configuration that needs more channels.
Leave rough-in conduit at ceiling locations even if you’re not installing ceiling speakers in the initial build. A 1-inch conduit stubbed out at each ceiling location with a pull string costs almost nothing and makes a future Dolby Atmos or DTS:X ceiling speaker install a termination job rather than a construction project.
For AV rack planning that connects to this pre-wire work, the rack location and its power supply need to be determined before wiring begins since all home runs terminate there. The rack also determines the length of every cable run, so finalizing its location is part of the wiring plan, not a separate decision.
If you’re building new construction theater from a blank slab, the wiring plan belongs in the construction drawings before the mechanical rough-in. Coordinate with the electrical contractor on conduit placement, plate drilling, and penetration locations while those decisions can still influence the framing. Changes made after the framing is set are more expensive than changes made on paper.
What Gets Skipped and Why It Costs You
The runs that get dropped in pre-wire are almost always the ones that seem redundant at the time. The second Cat6 to the projector. The conduit at the rear speaker wall. The extra run of speaker wire to the side walls. Each of these feels like insurance for a scenario that may not happen. Each of them turns into a retrofit project when it does.
Wiring has no monthly cost once it’s installed. The pull string has no ongoing maintenance requirement. The second conduit doesn’t require a second subscription. The cost of skipping these items during pre-wire is entirely deferred to the retrofit stage, where each run costs five to ten times more in time and materials than it would have cost during initial construction.
Do the wiring plan before the drywall stage. Pull what the plan calls for, then pull pull strings for everything else. Label both ends before the wall closes. Every other part of the home theater build benefits from getting this part right first.