Home Theater Lighting Design: Sconces, Aisle Lights, and Dimmable Systems
Good home theater lighting design does two things at once: it creates the right atmosphere for watching and keeps the space safe and functional when the movie isn’t running. Getting both right means thinking in zones, choosing fixtures that serve each zone’s purpose, and wiring everything into a system that can transition from “people are arriving” to “feature is playing” without anyone flipping a switch.
The Four Lighting Zones in a Home Theater
Every well-designed theater breaks lighting into at least four distinct zones, each serving a different purpose.
General lighting handles the room before and after a screening. Overhead or perimeter fixtures bring the space up to a comfortable level for guests to settle in, find seats, and move around. This zone runs bright during setup and goes to zero once the content starts.
Pathway and aisle lighting stays on through the entire film. Its job is safety, not aesthetics. Anyone getting up for a drink or heading to the bathroom needs to see the floor without flooding the screen with stray light.
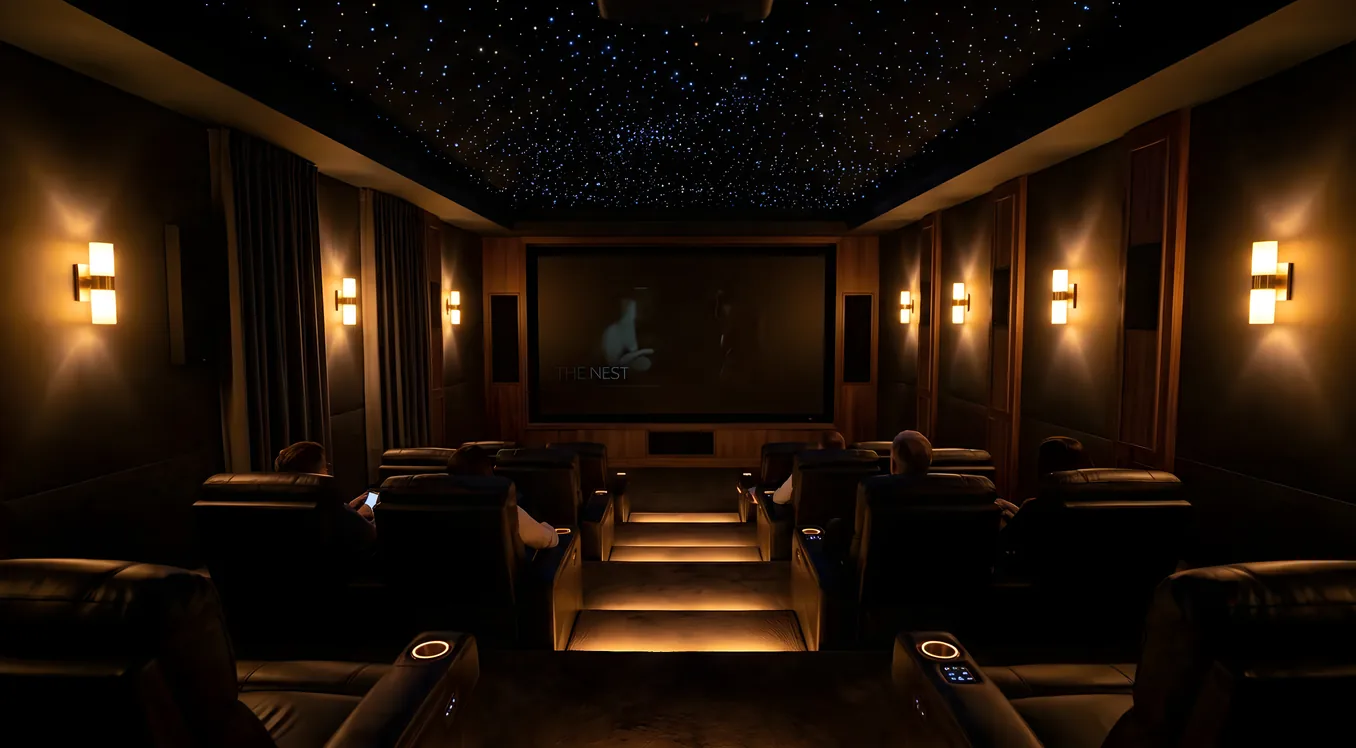
Accent lighting adds visual character. Sconces on side walls, lit niches, and decorative strip work give the room a cinematic identity and make it feel designed rather than improvised.
Screen bias lighting sits behind the display and reduces the perceived contrast between a bright screen and a dark wall. It is functional rather than decorative, and it belongs in a category of its own because it uses a different color temperature than everything else in the room.
Getting these four zones on separate circuits, each with independent dimmer control, is the foundation of a home theater lighting system that actually performs.
Sconces: Wall-Mounted Accent Fixtures
Sconces define the visual character of a theater more than any other fixture type. Placed at eye level on side walls, they provide low-level fill light during a screening and serve as the primary “look” of the room when the lights are up.
Art deco and classic theater-style sconces are the most popular choice for dedicated rooms. Frosted amber glass, geometric brass frames, and stepped profiles reference the movie palace tradition and read as intentionally theatrical. Brands like Home Theater Mart carry purpose-built cinema sconces in this aesthetic, with shielded bulb housings that prevent direct glare reaching the screen.
Modern and minimalist sconces work better in contemporary home theaters where the design language is clean lines and dark surfaces. WAC Lighting produces LED-integrated wall fixtures in matte black and brushed nickel finishes that disappear visually when off and emit a controlled wash of warm light when on.
Uplighting vs. downlighting is a practical decision, not just an aesthetic one. Downlighting from a sconce directs light toward the seating area and the floor, which is useful for aisle visibility. Uplighting bounces off the ceiling and adds ambient fill without introducing horizontal glare. Many theater sconces are bidirectional, sending a controlled amount of light both up and down.
Place sconces between rows if you have tiered seating, or evenly spaced along the side walls if it is a single-level layout. Keep them below the screen height so they never compete with the display for eye attention.
Aisle and Step Lighting
Aisle lighting is the one circuit that stays on at all times during a screening. The goal is to light the floor and the edges of risers without producing any upward spill that would wash out the image.
LED strip on riser edges is the most common installation. A narrow strip of warm-white LEDs runs along the vertical face of each riser, illuminating the step below it. The strip is recessed slightly or shielded with an aluminum channel so the light source itself is never directly visible from seated positions.
Recessed step lights are small round or square fixtures set into the riser face. They are a cleaner look than surface-mounted strips and handle the same job. The primary advantage is durability: no exposed LED tape to catch on feet or vacuum attachments.
Rope light under seats creates a ground-level glow effect that doubles as safety lighting. Run a channel along the underside of tiered seat platforms to illuminate the floor between rows. This approach is especially useful in wider rooms where riser edge lighting alone does not reach the center of the aisle.
All aisle fixtures should be on a dedicated low-level circuit, separate from the main room dimmers, so they can remain active even when every other zone is at zero.
Cove Lighting and Indirect LED
Cove lighting uses the ceiling architecture to hide the light source while directing output downward or across the ceiling plane. The result is a soft, glare-free ambient glow that fills the room without any fixture being visible.
The standard installation runs LED strip inside a ceiling tray or behind crown molding, aimed upward at the ceiling surface. The ceiling becomes the diffuser. Light output is even and shadow-free. Because the source is hidden, cove lighting reads as ambient rather than architectural, which suits a theater environment where you want the room to feel lit without any obvious fixture drawing the eye.
For home theaters, warm white cove lighting at 2700K creates an atmosphere that feels properly cinematic, consistent with the warm incandescent look of traditional screening rooms. Keep the strip output modest: cove lighting should supplement, not compete with, other zone fixtures.
Cove lighting on a dimmer gives you the most control. At full output it provides functional fill for pre-show activity. Dimmed to 20-30%, it becomes atmospheric accent that does not interfere with a darkened screen.
Star Ceilings: Fiber Optic Panels
The star ceiling is the most recognizable home theater aesthetic feature, and among the most requested. Done well, it transforms a standard room into something genuinely immersive.
Fiber optic systems are the practical choice for home installations. A single illuminator unit, typically mounted in an accessible wall cavity or mechanical chase, drives hundreds of individual fiber strands embedded in a ceiling panel. Each strand terminates in a tiny pinpoint of light. The illuminator is the only component that generates heat, and it sits out of the occupied space entirely.
Wiedamark and SensoryMoon are two commonly referenced manufacturers for residential fiber optic ceiling kits. These systems are available in panel form (pre-embedded fiber in fabric or foam) or as loose fiber bundles you can route through a custom ceiling material yourself. Panel systems are faster to install; loose fiber systems give more placement control but require more labor.
Color is handled at the illuminator. A color wheel or RGB LED source cycles through hues to create twinkling effects, or it locks to a fixed warm white for a static star field. The twinkling effect comes from a wheel with a cutout that interrupts fiber outputs at random intervals, not from individual addressable LEDs at each star point.
Star ceilings pair well with cove lighting. Run the cove at low output in a deep blue or violet, and the fiber optic stars read as distinctly brighter by contrast.
Dimming Systems: From DIY to Professional
The dimming system is what makes a theater’s lighting actually function as a theater. Manual switching between full-on and full-off is not a design strategy. Every zone needs smooth, low-end dimming that can hold stable at 5-10% without flickering.
Lutron Caseta is the standard recommendation for DIY installations. The system uses a proprietary RF protocol that does not require a neutral wire at the switch location, which matters in older homes. Caseta dimmers handle LED loads cleanly down to very low levels without the buzzing and flickering that plague cheaper dimmers. The ecosystem connects to most major smart home platforms, and the app supports scene programming for basic automation. See our full Lutron lighting guide for installation specifics and compatible fixture lists.
Lutron RadioRA 3 is the professional-grade alternative. It supports larger installations, more zones, and deeper integration with third-party AV control systems. If your theater is controlled by a Crestron, Control4, or Savant processor, RadioRA 3 is the Lutron system that integrates cleanly. It is not a DIY product; programming requires a licensed Lutron dealer and the design software they provide.
Leviton and Insteon offer mid-tier dimming options. Leviton’s Decora Smart line is a competent DIY choice if the Caseta ecosystem does not fit your situation. Insteon occupies a less certain position since its cloud service outage in 2022, and it requires careful evaluation of whether local control has been fully restored before relying on it for a new installation.
Regardless of brand, buy dimmers that are specifically rated for LED loads. Dimmers rated for incandescent only will flicker, buzz, and shorten LED driver life.
Color Temperature in a Home Theater
Color temperature is measured in Kelvins. Lower numbers (2700-3000K) produce warm, amber-tinted light. Higher numbers (4000-6500K) produce cool, blue-tinted light.
For theater ambiance, 2700K warm white is the correct choice for sconces, cove lighting, and aisle LEDs. This temperature matches traditional incandescent sources, produces minimal eye fatigue in a dark room, and does not shift color perception when the lights are low and the screen is bright.
One exception: bias lighting behind the screen uses 6500K, not 2700K. The reason is that 6500K matches the white point of modern displays. When bias light closely matches the color temperature of the screen, your eyes adapt to a single color reference, which reduces the perceptual contrast between the bright screen and the surrounding dark wall.
Do not mix color temperatures within a zone. Warm sconces next to cool cove lighting creates a visually inconsistent look that calls attention to the fixtures rather than receding into the background.
Bias Lighting Behind the Screen
Bias lighting is mounted behind the display, against the wall, so that it produces a soft halo effect around the screen perimeter. The light is indirect: it never shines toward the viewer, only toward the wall surface immediately behind the display.
The primary benefit is perceptual. A bright image on a pitch-black wall creates extreme local contrast that causes eye fatigue during long viewing sessions. A gentle light source behind the screen brings up the surrounding luminance, reducing that contrast without washing out the image itself.
Use 6500K LED strip rated at low output for bias lighting. Most dedicated bias strips are available in set lengths for common screen sizes and run off USB power from the television itself, which means they turn on and off automatically with the display.
LED strip placement for bias lighting follows the same physical principle as cove lighting: the strip faces the wall, not the viewer, and the wall becomes the diffuser. Mount the strip on the back edge of the television or on a channel attached to the wall, angled so output hits the wall rather than spilling into the room.
Smart Integration: Building Lighting Scenes
Lighting scenes are the payoff for building the system correctly. A single button press or voice command transitions the room through a defined sequence rather than requiring manual adjustment of each zone.
A “movie mode” scene runs through this sequence: general lighting dims to zero, cove lighting drops to 10-15%, aisle lighting stays active at full output, and bias lighting activates with the display. The transition takes 3-5 seconds rather than snapping between states, which is easier on the eyes and more cinematic in feel.
A “pre-show” scene brings the room up to a comfortable level for guests: general lighting at 70%, sconces at 50%, aisle lights on. An “intermission” scene mirrors pre-show but leaves the bias lighting active since the display is still on.
For how to program these sequences and connect them to AV triggers, the automation scenes guide covers the most common integration paths between Lutron, Control4, and direct IP triggers.
LED Strip Placement Guide
LED strip is versatile enough to serve multiple zones: bias lighting, cove fill, riser edge illumination, and under-seat aisle lighting. Keeping the installation clean requires careful channel selection and consistent color temperature within each zone.
Use aluminum extrusion channels with diffuser covers for any exposed strip runs. The diffuser spreads point-source LEDs into a continuous line and reduces the “dotted” look at close distances. For riser edge lighting, a narrow 8mm channel keeps the profile small enough to fit on a standard riser face.
Run separate strip circuits for bias lighting (6500K) and all other zones (2700K). Do not mix them on the same controller.
What Not to Do
A few common mistakes produce lighting setups that actively hurt the theater experience.
Can lights pointed at the screen are the most common problem in rooms converted from general-purpose living spaces. A recessed can in the ceiling above the viewing area sends a cone of light directly into the screen surface, washing out the image even when the rest of the room is dim. If the room already has cans, put them on a dedicated circuit, keep them off during viewing, and route theater light through sconces, cove, and aisle fixtures instead.
Cool white (5000K and above) in the theater zone creates a clinical environment that works against the atmosphere you are building. It also shifts color perception in a way that makes the warm-white screen image look orange by comparison. Reserve 5000K and above for utility spaces.
Skipping the low-end dimming test before finalizing fixture and dimmer choices is a mistake that costs time and money to fix. Buy one fixture and one dimmer from your shortlist and test them together at 5-10% output before ordering the full installation quantity. If the combination buzzes or flickers at low levels, try a different dimmer brand before assuming the fixture is the problem.
For more on how lighting choices fit into the broader room design, including acoustic panels, seating tiers, and wall treatments, see our guide to theater aesthetics.