Home Theater Automation: Scenes, Macros, and One-Touch Control
A well-automated home theater does not feel like technology. You press one button, the room responds, and you stop thinking about the equipment entirely. That experience is built on scenes: single triggers that fire a coordinated sequence of commands across every device in the room. Understanding how scenes work, where they break, and which platforms do them well will save you from a system that requires three remotes and a prayer every movie night.
What a Scene Actually Does
A scene is a named state for your theater room. “Watch Movie” is not a button that turns on your projector. It is a set of instructions that tells every controllable device in the room to move to a specific configuration at the same time (or in a deliberate sequence when order matters).
The scene concept sits at the core of professional home theater automation. Instead of operating each device manually, you define the desired end state once, and the controller executes it every time. The result is consistent: the room looks and sounds the same at the start of every film, regardless of what state it was in before.
Common Theater Scenes and What They Control
Most well-designed systems include a set of standard scenes that cover the primary use cases for the room:
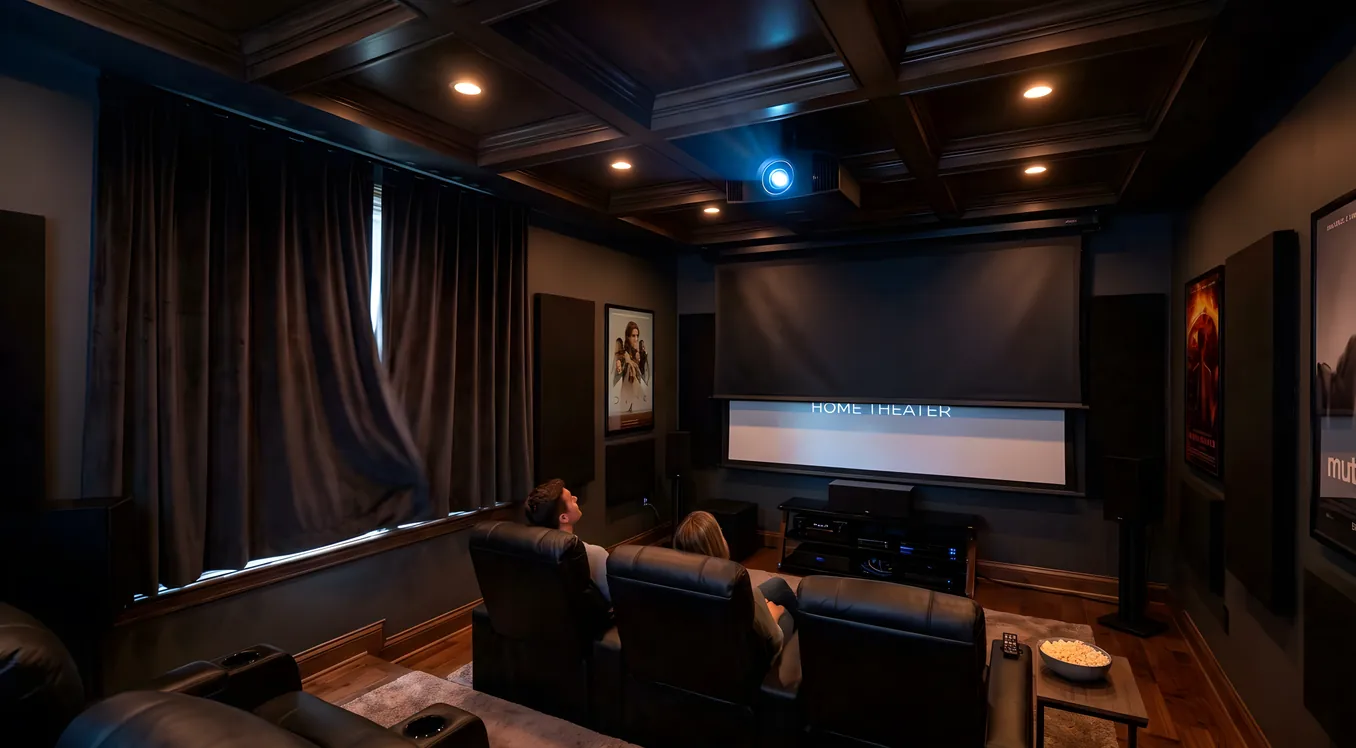
Watch Movie fires when you sit down for a feature film. It handles lighting, shading, display, and audio in one shot.
Watch TV is a lighter version: less dramatic dimming, often a different input source, and typically no screen descent if you are using a flat panel rather than a projector.
Listen to Music usually brings lights to a comfortable ambient level, disables the display, and routes audio to a music source or streaming service.
Game Mode switches the receiver to a gaming console input, adjusts display settings to reduce input lag, and keeps ambient lighting slightly higher so you can see a controller.
Pause brings the lights up partway while the content is stopped, so people can move around safely without killing the mood entirely.
Intermission is similar to Pause but more intentional: full lights, maybe a bathroom break cue on screen. Useful for long films or sports events.
Goodnight powers down everything in a defined order, retracts the screen, raises the shades if motorized, and confirms the room is off.
Each scene is a template you define once during setup and refine over time. The goal is zero manual device operation after the initial trigger.
The Watch Movie Scene, Step by Step
This is the scene most people want and the one that reveals the most complexity. A properly built Watch Movie scene for a projector-based system does the following:
- Sends a close command to motorized shades
- Dims overhead lights to 0% (or to a very low aisle value)
- Sends a power-on command to the projector
- Sends a lower command to the projection screen
- Sends the receiver to the Blu-ray or media player input
- Waits approximately 30 seconds for the projector lamp to warm up
- Turns on aisle lights (usually cove or step lighting) at 5% so people can navigate
The delay at step six matters. If the system tries to switch inputs or play content before the projector has finished warming up, you get a blank screen or an HDMI handshake failure that requires manual intervention to clear. A properly timed scene hides all of that from the viewer.
Macro vs. Scene: What Is the Difference?
These terms are often used interchangeably, but they describe different execution models.
A macro executes commands sequentially, one after another, often with configurable delays between each step. The system sends command one, waits, sends command two, waits, and so on. Macros are the foundation of older universal remotes and some DIY setups.
A scene executes commands simultaneously, setting every device to its target state at once. Where timing is required (projector warm-up, for example), the scene uses internal delays or conditional triggers rather than strictly sequential execution.
In practice, most modern platforms describe their one-touch triggers as scenes even when the underlying execution includes sequential logic. The user experience is the same either way: one trigger, one result.
Platforms That Run Home Theater Automation
The platform you choose determines how much control you have, how much the system costs, and how much you depend on professional support.
Professional platforms like Control4, Savant, and Crestron are designed for whole-home automation with the home theater as one subsystem. They offer deep device libraries, reliable two-way communication (the controller knows whether the projector actually turned on, not just whether the command was sent), and professionally managed programming. Cost is significant: installation, licensing, and programming fees typically run into thousands of dollars. In return, you get a system built to a specification with professional support when something breaks.
DIY platforms like Home Assistant and Hubitat give you substantial control at a fraction of the cost, but you own the integration work. These platforms can manage IR blasters, smart plugs, and Z-Wave or Zigbee devices. They support scene creation natively. The trade-off is time: building a reliable Watch Movie scene in Home Assistant means configuring the IR codes for your projector, setting up the right delays, and troubleshooting when a device does not respond. For technically capable homeowners, this is a workable path. For everyone else, the friction is real.
Logitech Harmony was the consumer market’s dominant solution for years, combining remote hardware with a cloud-based activity (their term for scenes) system. Logitech discontinued the Harmony line in 2021, but millions of units remain in use. Existing systems continue to function, though the platform receives no new development and replacement hardware is unavailable. Harmony owners should plan for a migration eventually; the platform is not a viable choice for new installations.
For a detailed comparison of control approaches, see our guide to universal remote vs. smart hub options.
Trigger Methods
A scene is only as useful as the ways you can activate it. Most systems support multiple trigger methods, and the right combination depends on how the room is used.
Remote buttons are the baseline. A dedicated scene button on a handheld remote is reliable and requires no technology beyond the remote itself working.
Keypads mount on the wall and give everyone in the household access to scenes without needing the main remote. A well-placed keypad near the theater entrance handles Watch Movie, Pause, and Goodnight without searching for the remote in the dark.
Voice commands work well for in-session adjustments. Saying “dim the lights” during a movie is faster than finding a remote. Voice is less reliable for complex startup sequences because it adds a dependency on the voice assistant infrastructure being available and correctly interpreting the command.
Phone apps are convenient for setup and infrequent adjustments. Most professional platforms and DIY systems offer companion apps. Apps are rarely the fastest trigger method for a movie night, but they give remote access and are useful when something goes wrong.
Presence detection can trigger scenes automatically. A motion sensor near the theater entrance can dim lights and prepare the room when someone enters. Keypad or remote confirmation still fires the full Watch Movie scene, but the room is already partially configured.
Lighting and Shading Integration
Lutron lighting is the standard for scene-based control because Lutron dimmers report their current state back to the controller and execute commands reliably. The Watch Movie scene sends a single dim command and the system knows within seconds whether it executed.
Generic Z-Wave or Zigbee dimmers work and are significantly cheaper, but two-way feedback is less consistent. Some devices confirm execution; others require the controller to poll for state. In a well-configured system, this is manageable. In a rushed install, it causes scenes that appear to succeed but leave one device in the wrong state.
Motorized shading integration follows similar logic. The shade motor receives a close command and travels to the down position. Most professional systems include travel-time compensation: the scene waits long enough for the shades to reach their final position before treating that step as complete.
Power Sequencing and Timing
Two areas of home theater automation require careful attention to timing: power-on sequences and power-off sequences.
On startup, the main concern is avoiding circuit overload. Amplifiers, projectors, and subwoofers all draw significant current at startup. Firing everything simultaneously can trip a breaker. A properly built Watch Movie scene staggers the power-on commands by several seconds so the surge is spread over time.
On shutdown, the main concern is equipment longevity. Projector lamps need cool-down time before the fan stops. Cutting power to a projector before the cool-down cycle completes shortens lamp life significantly. A Goodnight scene should power off the lamp first and then wait two to five minutes before cutting power to the projector’s smart plug. During that window, other devices (receiver, media players, lighting) can power down normally.
Automation Failures and How to Avoid Them
Three failure modes appear repeatedly in home theater automation systems.
HDMI handshake failures occur when a source device and display cannot agree on signal parameters after a control system switches inputs. The fix is usually adding a small delay (two to three seconds) between the input switch command and any attempt to play content. On Control4 and similar platforms, this is a timing parameter in the scene definition.
Device not responding happens when the controller sends a command and the device does not execute. With IR-based control, this is often a line-of-sight issue or a code timing problem. With network-based control, it is often a device that has lost its IP address or gone to sleep. Professional platforms maintain persistent connections to network devices and alert on loss of connectivity. DIY platforms require monitoring setup to catch this proactively.
Timing too tight is the most common issue in self-built systems. The scene moves to the next step before the current one completes, producing a result that works sometimes and fails other times. The fix is to add buffer time to delays, even when it feels excessive. A scene that takes 45 seconds to complete but works every time is far better than one that takes 30 seconds and fails 20% of the time.
Voice Control in the Theater Context
Voice control works well for scene recall and individual device adjustments during a session. “Play” and “pause” via voice are reliable. “Start movie night” reliably triggers a Watch Movie scene on platforms that support it.
Where voice struggles is in recovery. If the Watch Movie scene fails partway through and you need to troubleshoot, voice commands are too high-level. You need direct device access, which means a remote or app.
The better architecture uses voice as a supplemental trigger, not the primary one. A keypad handles reliable scene activation; voice handles convenience commands like volume and lighting adjustments during the session.
DIY Automation with Home Assistant
Home Assistant can run a functional theater automation setup for hardware costs in the hundreds of dollars rather than thousands. The practical setup involves an IR blaster for projector and receiver control, smart plugs on devices without network control, and Zigbee or Z-Wave dimmers for lighting.
The limitations are real. IR commands fire and forget: Home Assistant does not know whether the projector received the command. Power-on delays must be set conservatively to accommodate devices that take varying amounts of time to respond. Scene recovery (what happens if a device misses a command) requires manual troubleshooting rather than the automatic retry logic built into professional platforms.
For a single-room setup where the owner is comfortable with the system, Home Assistant is a legitimate choice. For a whole-home install or a theater room that multiple family members use independently, the management overhead often outweighs the savings.
Getting the Scenes Right
The measure of a good scene is not whether it works in a demo. It is whether it works every time, for everyone in the household, without any knowledge of what is running behind it. That reliability comes from careful timing, two-way device feedback, and power sequencing that accounts for the actual behavior of real hardware.
Start with a small set of scenes (Watch Movie, Pause, Goodnight) and get those working correctly before adding complexity. Each scene you add increases the number of things that can go wrong. A system with three rock-solid scenes is worth more than one with twelve scenes that occasionally require manual recovery.