TV Mounting Guide: Height, Angles, Studs, and Cable Management
Mounting a TV looks simple until you’re standing on a ladder with a drill, second-guessing every measurement. Get the height wrong and you spend every movie night tilting your head back. Get the wall anchoring wrong and a 65-inch TV ends up on the floor. This guide covers the decisions that actually matter: where to hang it, what kind of mount to use, how to find the studs, and what to do with the cables afterward.
Ideal Viewing Height: Center at Eye Level, Not Top of the Screen
The most common mounting mistake is hanging the TV too high. The target is simple: the center of the screen should sit at seated eye level. For most people sitting on a standard sofa, that puts the screen center somewhere between 42 and 48 inches from the floor.
Measure from the floor to where the center of your TV will land, not to the top or bottom. If your TV is 40 inches tall, the bottom of the mount should be around 22 to 28 inches up the wall. That number shifts depending on your couch height, so actually sit down and eyeball the spot on the wall before you drill.
This matters more than most people realize. Viewing from below a steep angle causes neck strain over long sessions and distorts image quality on LCD panels, which have narrower vertical viewing angles than horizontal ones. OLED and QLED sets handle off-axis viewing better, but the geometry of your neck does not.
The Fireplace Problem
Mounting above a fireplace is the single most requested and most problematic placement in residential home theater. The mantel is at a convenient height for the mount hardware, so it feels natural. In practice, it usually puts the screen 60 to 70 inches off the floor, which means you’re looking up at a 20 to 30 degree angle for every viewing session.
Short sightlines in a small room can partially compensate for this, but there is no room configuration that makes extended upward viewing comfortable.
If the fireplace wall is the only realistic option, a pull-down articulating mount is the practical workaround. MantelMount makes the most recognized product in this category. The arm pulls the TV down and tilts it toward the viewer, so the screen is positioned closer to eye level when you’re watching. When not in use, it retracts flush to the wall. These mounts run significantly more than standard fixed or tilting mounts, typically $200 to $600 depending on TV weight and arm travel, but they solve a real problem rather than pretending it does not exist.
A secondary concern with fireplace installations is heat. TVs mounted directly above an active wood-burning or gas fireplace are exposed to rising heat that can degrade electronics over time. If the fireplace is used regularly, factor in a heat shield or consider whether that wall is the right choice at all.
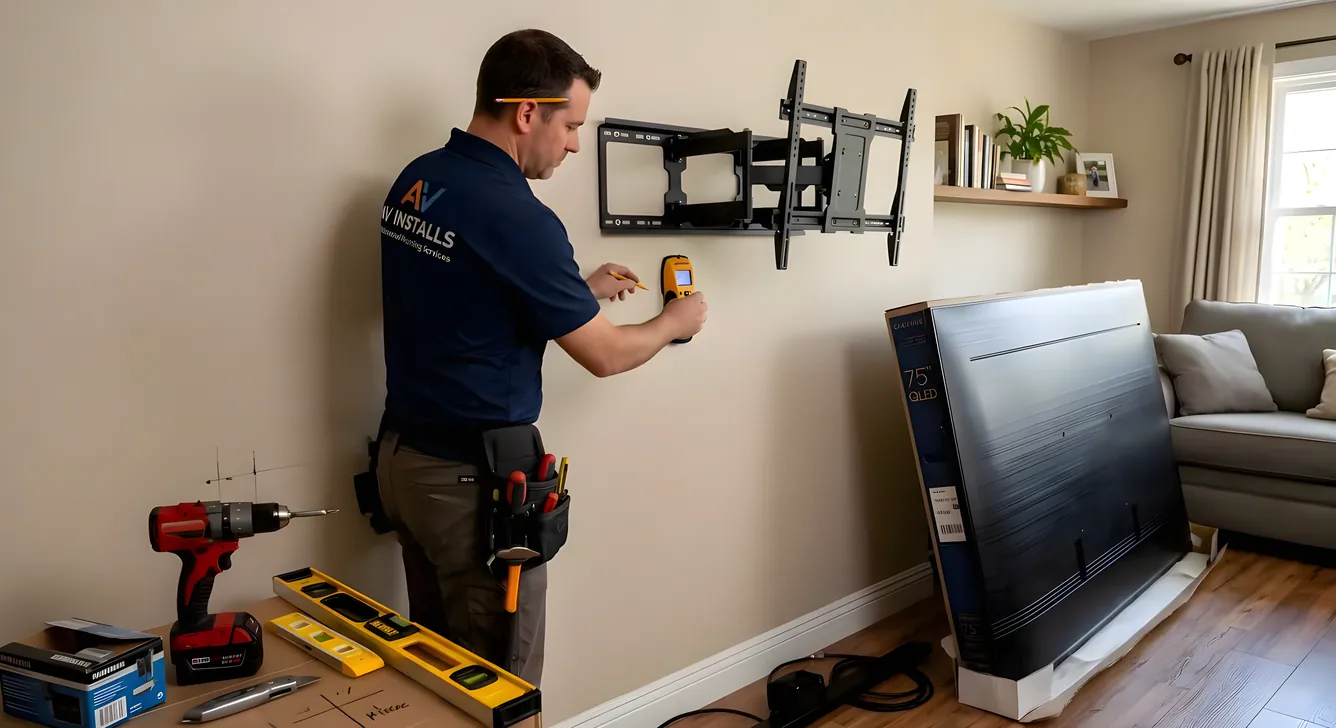
Mount Types and When to Use Each
Fixed mounts hold the TV flat against the wall with no movement. They are the least expensive and most stable option, and they work well when you know exactly where you’ll sit relative to the screen. If the viewing position is fixed and centered, a fixed mount is often the right call.
Tilting mounts let you angle the screen downward, typically 5 to 15 degrees. They are useful when the TV needs to be mounted higher than ideal because of furniture placement or room layout. The tilt compensates for some of the vertical angle issue. They add 15 to 30 dollars over a comparable fixed mount.
Full-motion mounts (also called articulating mounts) extend away from the wall on an arm and pivot left, right, up, and down. They are the right choice for rooms where viewing happens from multiple angles, like a kitchen or open-plan space where the TV serves both a seating area and a counter. They are also useful for corner installations where a fixed angle would not work. The tradeoff is weight capacity (the arm puts more leverage stress on the wall anchor), complexity, and price. Quality full-motion mounts from Sanus, Kanto, or Vogel’s run $80 to $300 or more. Cheap articulating mounts develop wobble over time.
Ceiling mounts are uncommon in residential settings but useful for commercial spaces, waiting rooms, or rooms where the ceiling provides the only viable placement. OmniMount makes several residential ceiling mount options.
Motorized mounts are the top tier, with electric actuators that extend, retract, or drop the TV on command. They are expensive (often $500 to $1,500 for quality units) and typically used in custom installations. MantelMount also offers a motorized pull-down for fireplace applications.
VESA Patterns: Why the Hole Spacing Matters
VESA (Video Electronics Standards Association) defines the bolt hole pattern on the back of every TV. The mount you buy must match your TV’s VESA pattern, or the hardware will not line up.
VESA is expressed as width x height in millimeters: 200x200, 300x300, 400x400, 600x400, 800x400, and so on. Your TV’s user manual lists its VESA pattern. You can also measure directly on the back of the set.
Most mounts support multiple VESA patterns using interchangeable bracket arms. A mount rated for 200x200 through 600x400 covers most TVs up to about 65 inches. Larger sets (75 inches and up) often use 800x400 or 900x600, and fewer universal mounts cover those sizes. If you are buying a mount for a large TV, check the specific VESA spec before purchasing.
Weight capacity is the second number to check. Every mount lists a maximum weight rating. Weigh your TV (the spec sheet lists this) and choose a mount rated for at least that weight, preferably with some margin. A 77-pound TV on a mount rated for 80 pounds is running at the limit. A mount rated for 110 pounds gives you the buffer to sleep soundly.
Finding Studs and Anchoring the Mount
Standard drywall is half-inch gypsum over nothing. It cannot hold a mounted TV reliably, particularly with a heavy set or a full-motion arm applying leverage. The mount needs to anchor into wall studs, which are the 2x4 or 2x6 vertical framing members behind the drywall, typically spaced 16 or 24 inches apart.
An electronic stud finder is the standard starting tool. Run it across the wall slowly and mark both edges of each stud; the center of the stud is where you want your lag screws. Stud finders have false positives, so after getting a reading, drive a small nail or probe into the wall to confirm. Studs feel solid; drywall between studs does not.
The VESA hole spacing on your mount needs to align with stud spacing. A 400x400 mount with holes 400mm (about 15.7 inches) apart will not land on studs at 16-inch centers without modification. Some mounts ship with a mounting bar that spans two studs regardless of VESA spacing, which solves this problem neatly.
Metal studs are standard in commercial construction and increasingly common in residential work. A stud finder with metal detection mode will identify them. Metal studs are thinner and less rigid than wood, so mounting into them requires self-tapping metal screws rated for the load. For heavier TVs or full-motion mounts on metal studs, a structural backing plate or toggle bolt system designed for metal framing is the more reliable path.
Toggle bolts (hollow wall anchors) are sometimes presented as a solution for mounting without studs. For a small, fixed, lightweight TV, a properly rated toggle bolt in good drywall can work. For anything over 40 inches, anything with a full-motion arm, or any installation where failure would be genuinely dangerous, stud anchoring is the correct approach. A toggle bolt failure during a kids’ movie night is not a problem to engineer toward.
Cable Management: In-Wall vs. Raceway
A TV on the wall with cables hanging down to an outlet defeats most of the visual purpose of mounting. There are two main approaches to making cables disappear.
In-wall cable routing runs cables through the wall cavity between the TV mount and an outlet or AV receiver below. For power, this requires an in-wall rated power cable (NM cable routed to a recessed outlet) or a power bridge kit that uses the existing outlet and runs a low-voltage extension inside the wall. The DataComm 50-10654-W is the most widely referenced power bridge kit for this application. It includes two wall plates: one recessed near the TV and one near the existing outlet. You cut holes, fish the cable through the wall cavity, and connect at both ends.
HDMI and other AV cables run through low-voltage brackets and wall plates separately, since building code in most jurisdictions prohibits running power and data cables in the same conduit inside the wall. Use CL2-rated HDMI and speaker cables for in-wall runs; CL2 is the UL classification for cables rated for in-wall installation.
Cable raceways are surface-mounted channels that attach to the wall and conceal cables without any drywall work. They are paintable, and when done carefully with matching paint, they read as part of the wall from a normal viewing distance. Raceways work well for rentals or situations where cutting into the wall is not feasible. The tradeoff is that they are never fully invisible the way in-wall routing is.
For an existing home theater setup where cable runs need to be organized without mounting concerns, see our cables and connectors guide for cable type specs and organization strategies.
Recommended Mount Brands
Sanus is the most broadly distributed quality brand in the US market, available at major retailers. Their mounts span fixed, tilting, and full-motion categories across a wide VESA and weight range. Build quality is consistent and above-average for the price tier.
Kanto makes well-regarded full-motion and fixed mounts with clean industrial aesthetics. The PDX650 is a frequently recommended full-motion option for sets up to 65 inches.
MantelMount is the category-defining brand for pull-down fireplace mounts. If your TV needs to go above a mantel, this is the mount to research first.
Vogel’s is a Dutch brand with strong engineering and a premium price tier. Their mounts are common in European markets and well-regarded in the US for larger commercial and residential installations.
OmniMount covers the basic residential and light commercial market with a broad product range, including ceiling mounts that the other brands do not emphasize.
DIY vs. Professional Installation
For a straightforward installation on a standard drywall wall with accessible studs, mounting a TV is a reasonable DIY project. You need a stud finder, a level, a drill with appropriate bits, and a helper for the final hang. The process takes one to two hours.
Hire a professional installer when:
The wall is made of brick, stone, concrete block, or tile. These require masonry anchors and different drilling technique, and the margin for error is higher.
The installation requires in-wall cable routing with a new electrical circuit. Running new wiring to a dedicated outlet behind the TV involves the electrical panel, and that work requires a licensed electrician in most jurisdictions.
The TV is very large and heavy (85 inches or larger). A 150-pound TV on a full-motion mount has significant weight and leverage. Getting that anchoring wrong is a serious structural failure, not a minor inconvenience.
The room has complex integration requirements (motorized mounts, automation systems, custom cabinetry). At that level, a custom home theater installer who coordinates all trades is worth the cost.
If you are comparing the full installation scenario against a projector setup, our projector vs. TV comparison covers the tradeoffs across room size, ambient light, and total cost.
Getting the Viewing Distance Right First
Before drilling into the wall, confirm the mounting position makes sense for your screen size. There is no value in mounting a TV at perfect ergonomic height if it is too close or too far for comfortable viewing. Our screen size and viewing distance guide covers the relationship between panel size, resolution, and ideal seating distance, which should inform where the couch goes as much as where the mount goes.
Making the Final Measurements
Mark the stud locations with painter’s tape. Use a level on the mount’s wall plate before drilling any anchor bolts. Hang the TV, step back to seated position, and check the angle before tightening everything down. Full-motion mounts in particular benefit from a second set of eyes to confirm the arm travel positions work for the actual furniture layout.
Cable management is the last step. Do not pull cables taut; leave a small loop at the TV end to allow for any adjustment if you reposition the mount later. Label all cables at both ends before routing in-wall if you have multiple inputs.
A well-mounted TV at the right height, on the right mount for the room, with cables out of sight, pays off across every viewing session that follows. The upfront time investment in getting the measurements and anchoring right is smaller than the ongoing cost of a screen that strains your neck or hardware that keeps you second-guessing the installation.