Dolby Atmos Speaker Placement: Height Channels, Angles, and Layouts
Dolby Atmos Speaker Placement: Height Channels, Angles, and Layouts
Getting Dolby Atmos right depends less on how much you spend on speakers and more on where you put them. A well-placed pair of in-ceiling speakers will consistently outperform expensive upfiring modules in the wrong position. This guide covers Dolby’s official placement guidelines, the three height channel layouts (2, 4, and 6 channels), ceiling considerations, and the real trade-offs between in-ceiling, upfiring, and on-wall height options.
The short version: two height speakers placed overhead in the top middle position is the easiest starting point. Four speakers (top front plus top rear) is the standard recommendation for most rooms. Six channels adds a top middle pair to that and delivers the most complete overhead field. Everything else comes down to your ceiling height, room geometry, and how much you’re willing to cut drywall.
Dolby’s Official Elevation Angles
Dolby publishes specific elevation angles for each height channel position. These aren’t suggestions; they’re the angles at which the rendering engine expects sound to arrive, and deviating significantly affects how well object-based audio tracks.
Top middle speakers should land between 30 and 55 degrees above the listener’s ear level. This is measured from the seated position, not from the floor. A 30-degree angle means the speaker is relatively close overhead; 55 degrees means it’s nearly straight up. Most rooms with standard ceiling heights naturally fall in this range when speakers are placed correctly.
Top front and top rear speakers use a wider angle range: 65 to 100 degrees. At 65 degrees, the speaker is still clearly to the front (or rear) of center; at 100 degrees, it’s past vertical, which is only achievable with angled baffles or specially positioned on-wall mounts. These wider angles are what create the sense of sound extending forward and backward above you, not just directly overhead.
Getting these angles wrong doesn’t make Atmos fail entirely, but it flattens the height dimension. Objects that should move from the front overhead position toward the rear will feel compressed or stationary.
Two Height Channels: Top Middle Pair
A 5.1.2 or 7.1.2 system uses two height speakers. Dolby’s recommendation for this layout is a top middle pair, placed directly above the listening position or slightly forward of it, positioned symmetrically left and right.
This is the best two-channel height configuration for two reasons. First, top middle placement sits in the sweet spot of Dolby’s 30-55 degree range without requiring any unusual geometry. Second, overhead sound in most Atmos content is anchored at or near the center of the room; two speakers placed there capture the most content.
For a room with a single primary seating row, aim for the speakers to be roughly at the midpoint between the front wall and the back wall, each about 2-3 feet to the left and right of center. For a room with multiple rows, position them above the primary listening row rather than splitting the difference.
If you’re using in-ceiling speakers here, non-angled drivers are fine. The speaker faces down, and the geometry puts it at the right elevation angle naturally. If your ceiling is unusually high (11 feet or more), consider angled baffles to bring the effective angle closer to the listening position.
Four Height Channels: Top Front Plus Top Rear
A 5.1.4 or 7.1.4 system is where most serious Atmos setups land. Dolby considers this the standard configuration. Four height channels break into two positions: top front and top rear.
Top front speakers go in front of the listening position, above the screen wall or somewhere between the screen and the main seating area. The target elevation angle is 65-100 degrees, which in a typical room means placing them in the ceiling toward the front third of the room. They should not be directly above or behind the main chairs; the angle needs to pull sound forward and upward from the listener’s perspective.
Top rear speakers mirror this behind the listening position, in the rear third of the room. Their job is creating the backward hemisphere of height, which is what makes sounds like rain, aircraft, and ambient soundscapes feel fully dimensional rather than just in front of you.
Width placement for both pairs follows the same logic as your main surround speakers: the left speaker goes left of center by roughly the same distance as your left surround, and the right matches. You’re building a consistent sound field, not a wider or narrower one at the ceiling.
This four-channel layout captures Atmos content more completely than two channels. Content mixed with top front and rear in mind (which includes most major film releases) will reproduce with the spatial movement the mixer intended.
Six Height Channels: Full Overhead Coverage
A 7.1.6 or 9.1.6 system adds a top middle pair to the top front and top rear configuration. Six height channels are less common outside of dedicated theater rooms, but they produce a noticeably more continuous overhead field.
The added value is in transitions. With four height channels, an object moving from the front overhead position to the rear has to jump from speaker to speaker with a gap in the middle. Six channels fill that gap, making overhead movement feel continuous rather than stepped. For film content with extensive overhead activity (animated films, science fiction with space sequences, action with aerial elements), the difference is audible.
Placement for the added top middle pair follows the same guidance from the two-channel section above: roughly centered in the room, above the primary listening position. When running all three pairs, the spacing between top front, top middle, and top rear should be roughly equal along the room’s length. Uneven spacing creates uneven object rendering.
Six height channels require an AV receiver with enough amplifier channels to drive them, or a separate amplifier for the additional pair. Most receivers cap out at 11 or 13 channels total; confirm your receiver’s channel count before planning a 7.1.6 layout.
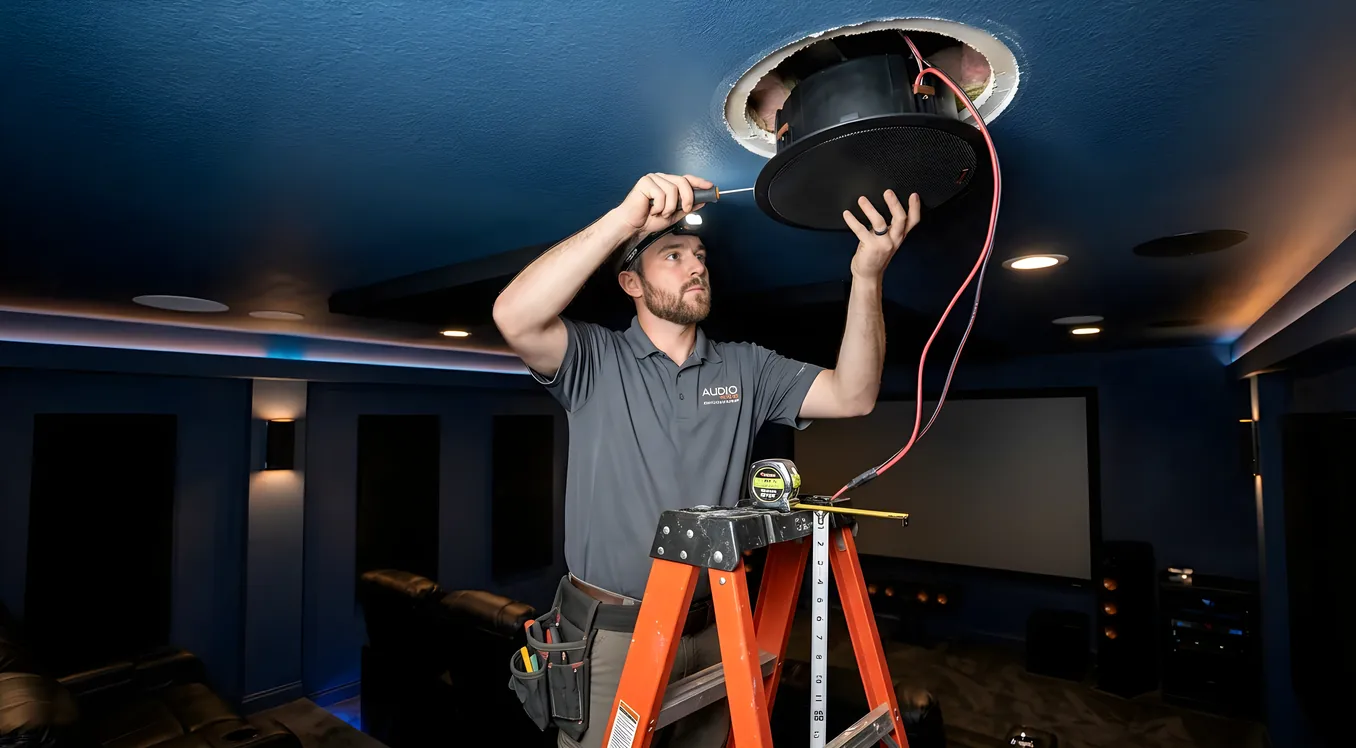
In-Ceiling Speakers: The Right Way to Install Them
In-ceiling speakers are the most acoustically correct height channel solution. The speaker is in the ceiling, aimed directly at the listening position, at or near the elevation angles Dolby specifies. There’s no proxy bounce involved.
Placement Before You Cut
Mark your planned speaker locations with painter’s tape before cutting anything. Sit in your primary listening position and have someone hold a speaker at the marked location while you assess the angle by eye. Adjust tape placement until the angle feels right, then check for ceiling joists, HVAC ducts, and wiring with a stud finder and inspection camera before committing.
Speaker mounting rings typically require a cutout between 6 and 7 inches in diameter. Most residential ceiling drywall is 1/2 inch thick; confirm this before ordering flush-mount rings. Run speaker wire before the drywall cutout if possible, or use a fish tape or flexible drill bit to run wire through the ceiling cavity after the fact.
Angled Versus Non-Angled Baffles
Standard in-ceiling speakers point straight down. For a listener seated directly below, this is fine. For top front and top rear positions, where the speaker is offset from the listener, a straight-down driver may not aim at the listening position at all.
Angled baffles let you rotate the driver toward the listening position within the ceiling housing. Many dedicated in-ceiling Atmos speakers include angled baffles specifically for this reason. If you’re using a speaker with a fixed, non-angled baffle in a top front or top rear position, check the geometry: if the speaker is far enough from the listening position, a straight-down driver will miss the sweet spot by several feet.
The rule of thumb: if your speaker is more than 4-5 feet horizontally from the listening position, consider angled baffles for top front and rear. For top middle (directly overhead), non-angled baffles are standard.
Ceiling Height Considerations
Room height affects both placement geometry and the listening experience.
8-foot ceilings are the most common and the most constrained. Speakers placed directly overhead end up very close to the listening position vertically, which can make height imaging feel less expansive. Placing top middle speakers slightly toward the front of the listening area (rather than directly above) can help. At 8 feet, angled baffles for top front and rear are almost always worth using.
9-foot ceilings are closer to ideal. Placement geometry works out more naturally, the separation between listening height and speaker height feels correct, and most standard placements land near Dolby’s recommended angles without adjustment.
10-foot and higher ceilings offer the most flexibility. Speaker placement can be more precise because there’s room to optimize angles. The tradeoff is that very high ceilings can make overhead sounds feel remote rather than immersive, particularly if the room has hard, reflective surfaces. Acoustic treatment (absorption panels, rugs) helps close that gap. Angled baffles are generally less important at these heights since the geometry naturally produces useful elevation angles.
Atmos-Enabled Upfiring Modules: When They Work and When They Don’t
Atmos-enabled speakers use an upward-firing driver to bounce sound off the ceiling and create a perceived overhead effect. They’re a real option, not a gimmick, but they come with meaningful limitations.
The physics depends on a flat, parallel ceiling. When sound bounces off a flat ceiling at the right angle, it reflects back toward the listener and the brain processes it as coming from above. This works reasonably well in apartments and rentals where cutting into ceilings isn’t an option, and in rooms where the ceiling height and surface are favorable.
The limitations are real. Vaulted, coffered, or textured ceilings break the reflection geometry. The effect degrades at greater ceiling heights because the reflected sound arrives with less energy and more diffusion. Precise localization (the sense that a specific sound is coming from a specific point overhead) is harder to achieve than with in-ceiling speakers. And the upfiring driver’s dispersion pattern means listeners not sitting in the sweet spot may hear significantly less height effect than those in the optimal seat.
Upfiring modules are best treated as a starting point or a constraint-based solution, not the preferred approach. If your situation requires them, choose a pair that places the upfiring driver at roughly the same horizontal position as your ears when seated (not behind you or to the side), and aim for a ceiling height between 8 and 11 feet. Test with content that has obvious overhead activity and compare what you hear to what the mix intends.
For a more grounded understanding of how room acoustics affect reflected sound, the acoustics 101 overview is worth reading before committing to upfiring as your height solution.
On-Wall Height Speakers: A Valid Fallback
When ceiling installation isn’t possible and upfiring physics don’t work out, on-wall height speakers mounted high on the front and rear walls provide another path. The speaker face aims downward and inward toward the listening position at the appropriate Dolby angle.
Mounting height matters more than in-ceiling or upfiring because the speaker has to produce the right elevation angle from a wall position. A speaker mounted 6.5 to 7 feet off the floor on the front wall, aimed at a seated listener, can approximate the 65-100 degree front height angle. Rear on-wall heights follow the same logic.
The drawback is imaging. Because the speaker is on a wall rather than in the ceiling, some of the overhead cue is lost, and bass from the driver can excite wall resonances differently than a ceiling mount would. On-wall heights also require speakers with some degree of downward dispersion or adjustable mounting hardware; standard bookshelf speakers pointed straight out from the wall don’t produce the right angle. Purpose-built on-wall height speakers address this with angled driver enclosures.
If you’re running a surround sound configuration that already uses a lot of discrete channels, the surround sound configurations reference covers how all the channel positions relate to each other, which is useful context before deciding on an on-wall fallback.
Choosing Speakers for Each Position
Height channels carry relatively low-energy content in most mixes. Explosions, LFE content, and primary dialogue are not handled by height speakers; you’re mostly reproducing ambient field sounds, directional effects, and object-based placements. This means height speakers don’t need to be large or expensive, but they do need solid high-frequency extension and smooth off-axis response.
For in-ceiling top middle positions, a 5.25 or 6.5-inch two-way with a silk dome tweeter and flat, non-angled baffle is the practical standard. Entry-level models from makers focused on architectural audio start around $100-150 per speaker. Angled-baffle versions cost slightly more but are purpose-built for top front and rear positions.
For top front and rear in-ceiling positions, look specifically for speakers marketed as “Atmos-enabled” in-ceiling speakers with adjustable pivoting tweeters or angled baffles. These let you aim the high-frequency driver at the listening position after installation.
Upfiring modules are typically sold as add-ons to existing floor-standing or bookshelf speaker types. Confirm that the upfiring driver’s frequency response is reasonably flat through the upper midrange, since this is where overhead sound localization cues live.
On-wall height speakers should match the tonal character of your main system as closely as possible. A noticeable tonal mismatch (too bright, too thin) at the height channels is distracting in surround content.
Setting Up Height Levels After Installation
Speaker placement is physical; speaker level matching is the step that makes it work correctly. After installing height speakers, run your AV receiver’s automatic room correction (Audyssey, YPAO, MCACC, or equivalent) with the calibration microphone placed at the primary listening position.
Most calibration systems will set crossover points for each speaker independently. Height speakers typically benefit from a higher crossover than mains (80-100 Hz or higher), since they’re smaller and not positioned for bass reinforcement. Let the calibration set this automatically, then review the results and adjust if any channel is obviously wrong.
Manual level-setting is also valid: pink noise through each channel, SPL meter at the listening position, target 75 dB SPL per channel at reference level. Atmos overhead levels are sometimes set 2-3 dB lower than mains by preference, since excessive height channel volume draws attention away from the primary speaker array.
Getting the Most Out of Your Layout
A 5.1.4 system with well-placed in-ceiling speakers in a room with 9-foot ceilings and proper level calibration will produce better Atmos than a 7.1.6 system with poorly placed upfiring modules on incorrect surface geometry. Placement discipline matters more than channel count.
Prioritize: get the angles right, use in-ceiling where possible, match levels with calibration. The height dimension of Atmos is where most home theater setups either come alive or fall flat, and it almost always comes down to where the speakers ended up in the room.